

Do-it-yourself coffee table
Making furniture with your own hands can not only save the budget, but also helps to reveal creative possibilities and creative ideas. On your own, you can perform an interesting version of the coffee table. Creating an exquisite and chic model is able to revive a dull interior, it is beneficial to emphasize it. In this article we will look at how to make a coffee table with your own hands from improvised materials.
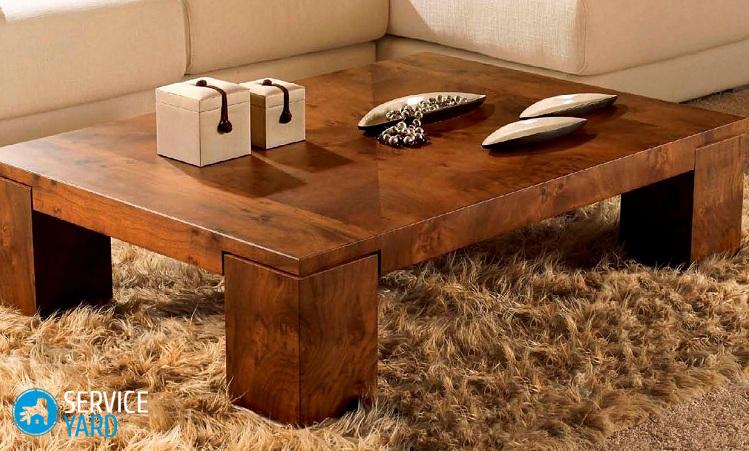
to contents ↑Simple-shaped coffee table
In the interior there is always free space for a side table. Such a piece of furniture fits perfectly near the sofa to place a flower vase on it or put a mug of coffee and a candy can with sweets. In addition, a coffee table can be used as a stand, on which it is convenient to place flowerpots with indoor plants. The bedside table can also be successfully replaced with a table made in an interesting design solution.
Tools and materials:
- board with dimensions of 15x40 cm - 2 pieces;
- a board with dimensions of 19x50 cm - 2 pieces;
- plates;
- legs
- wood glue;
- paint (stain, varnish).
How to make a simple do-it-yourself coffee table:
- On a larger board, we fix the plates for fixing the legs. We step back a bit from the edges.
- We fix the upper and side surfaces of the table with wood glue, which dries out within half an hour.
- After that, our product is treated with paint, stain or varnish.
- At will - we decorate and decorate the made little table.
Cement coffee table
Recently, interior elements made of concrete are gaining more and more popularity. Despite all the attractiveness and openness for decor, such products also have disadvantages:
- The first disadvantage is a very expensive process, in which a large amount of concrete is cast.
- For small side tables, the second negative point is the heavy weight of the furniture. Moving such a product from one place to another is very inconvenient and requires physical strength.
Tools and materials
You can make a good solid piece of furniture with your own hands. To do this, prepare the following materials and tools:
- foam insulation plate, the size of which is 120x240x2.5 cm;
- HENRY 549 FeatherFinish cement - 1 pack;
- 3M Super 77 - aerosol adhesive; 1 spray can;
- hacksaw;
- sandpaper, in which the grain size is from 36 to 120;
- different size of spatulas;
- paint;
- universal knife;
- grinding device;
- respirator 3.

How to make a self-made cement coffee table:
- We make the markup and cut the foam sheet. From a piece with a size of 120x240 cm, cut out 18 squares with a size of 40x40 cm. When folding them into each other, we get a parallelepiped whose size is 40x40x45 cm.
- Glue the cut parts. For this purpose we will use 3M Super 77 aerosol glue.
Important! It is advisable to perform such a procedure not in a room, but in an open space. It is also imperative to protect your hands with gloves and put on a shirt with long sleeves.
- On the first side of the square we apply an even layer of glue.
- The side of the second square is treated in the same way with glue.
- After 15 seconds we connect the squares - the edges should be docked.
- We repeat this procedure with all the squares.
- Square billets are combined into a single whole. After 30 minutes, proceed to the next step.
- The resulting parallelepiped is given the outlines of the future table. At first, the design has a rough angular shape. By polishing, we smooth out all the irregularities, we give the product the desired look. We start with the use of sandpaper 36 grain size, gradually we move on to the use of sandpaper, in which the grain size is smaller.
- When the surface of the future coffee table is polished, it needs to be cemented. When applying the first layer, all voids of the foam form are filled. Within 20 minutes, you need to quickly smooth out all the bumps.
- When the first layer dries, apply the next layer. The number of layers applied depends on how smooth and even the surface of the table will be.
Important! When preparing a cement mortar, you must adhere to the manufacturer's instructions, do not prepare a large amount of mortar. Since this procedure is dirty, the floor in the workshop must be covered with old newspapers or oilcloth.
- After applying and drying the last layer, we finally grind the surface of the table.
Important! When performing the grinding procedure, it is necessary to use a mask that protects the lungs from cement dust.
The made coffee table turns out to be strong and durable, while weighing no more than a kilogram.
to contents ↑Coffee table made of copper pipes
Do-it-yourself coffee table can be made of any material. A table made of copper tubes is a very interesting design decision.
Tools and materials
- 6 meters 1/2 ″ copper pipe;
- clamps that serve to attach 1/2 ″ pipes - 4 pieces;
- 1/2 ″ copper caps - 8 pieces;
- copper tees for 1/2 ″ pipes - 14 pieces;
- boards made of wood or slabs measuring 30x28 cm - 2 pcs;
- pieces of pipe 2.5 cm long - 4 pcs;
- liquid nails or epoxy glue;
- pipe cutting device.
Manufacturing process
How to make a coffee table with your own hands from copper pipes:
- We cut out the necessary blanks.
- We begin the process of assembling the lower tier of the table.
- Having collected the lower part of the product, we begin to collect the upper tier.
- We place pieces of pipe with a size of 2.5 cm in the tees, which are located in the upper side of the corner posts.
- On inserts having exactly the same diameter as the tees, we put on decorative caps.
- We fix the pre-painted wooden shelves of our product with special devices - clamps placed on the underside of each board.
- After all the tubes of the required length are cut out and well adjusted to each other, we carry out a preliminary assembly of the design of the coffee table. For a reliable connection, we use special glue.
- The coffee table made of copper tubes is ready for use.
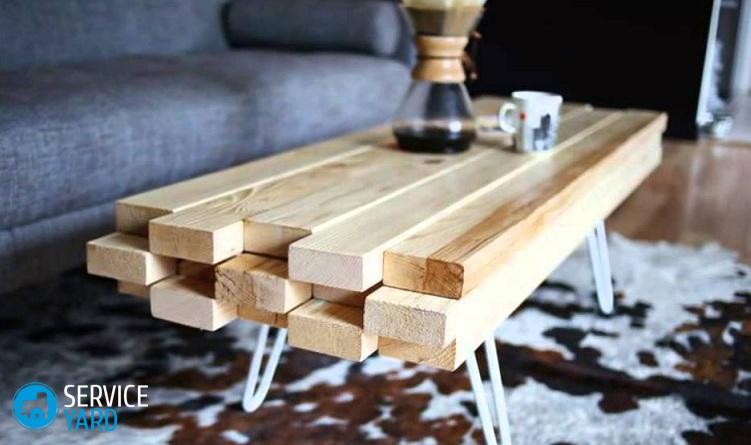
Coffee table made of wooden slats
A stylish table made of wooden slats fits perfectly into any interior. Consider the appropriate materials and tools necessary to create such a piece of furniture.
Materials:
- 3 boards with dimensions 2.5x7.5 cm;
- 1 board the size of which is 2.5x10 cm;
- 8 boards with dimensions of 2.5x5 cm;
- 4 fastening elements for table legs;
- 4 elements of conical legs, the length of which is 35-45 cm and depends on the required value of the height of the table;
- 8 screws, the length of which is 3.5 cm;
- 32 wooden flat head screws with a length of 3 cm;
- 16 nails for decoration, the length of which is 3.75 cm;
- Gorilla Glue special glue;
- putties used for wooden surfaces;
- paint and primer on wood;
- sandpaper 120 and 220 grit.
Instruments
- hacksaw;
- special drills and drill;
- Kreg kit, the use of which allows you to drill countersunk holes at an angle;
- 2 long and 2 short clamps;
- roulette;
- hammer;
- grinding machine.
How to make a coffee table from wooden racks with your own hands:
- Using a hacksaw, at an angle of 45 degrees, we reduce the ends of two boards, which had a size of 2.5 × 7.5 cm.
- From the bars with dimensions of 2.5 × 5 cm, we cut out the details, the length of which corresponds to the internal length of the workpieces with dimensions of 2.5 × 7.5 cm.
- We place the details of blanks with dimensions of 2.5 × 5 cm in the middle, and blanks with dimensions of 2.5 × 7.5 cm at the edges. In this case, the ends of the internal rails should be aligned.
- We measure the distance between the extreme bars with a size of 2.5 × 7.5 cm, cut out two parts of the workpiece with the obtained value from the board with a length of 2.5 × 10 cm. They are the lower supports for our table.
- We fix them with screwed-in screws that are screwed into each longitudinal rail.
- Using the Kreg Jig kit, we drill 2 pocket holes at the end of each transverse support. Such holes will be used to connect the extreme bars with parts having a size of 2.5 × 7.5 cm.
Important! It is difficult to specifically recommend the distance from the edge at which the Kreg Jig conductor is mounted. The length of the screws used, the exact thickness of the board and other factors affect this value. To guess with the size, you can pre-practice with unnecessary trimmed boards.
- We place the details of workpieces with a size of 2.5x7.5 cm along the edges of our design.
- Check the ends so that they are on the same level. We fix them with clamps.
Important! If soft wood, for example, pine, is used to make a coffee table with your own hands, then unnecessary trim of the boards must be placed under the clamp supports so that there are no traces when clamping on the wood.
- Firmly and securely fasten the extreme bars with a size of 2.5x7.5 cm to the base of the table.
- We screw the screws with a length of 3.5 cm into the hidden pocket holes that were previously drilled at the end of each transverse support.
- To determine the length of the ends of the table, measure the width of the manufactured base, cut out the desired size from the workpiece 2.5 × 7.5 cm.
Important! It is recommended to leave a small margin in length so that the perfect size is achieved during the grinding process when fitting.
- We apply a small amount of special Gorilla Glue glue to the ends of all the rails that first need to be moistened with water.
- We install the end boards in the right place.
Important! To prevent the structure from breaking prematurely, it must be wrapped with a belt while the glue dries. For a reliable effect, you can additionally fix the ends with several carnations, which are used for decoration.
- To eliminate all irregularities at the joints, we grind the surface of the table with sandpaper, which has a grain size of 120.
- It is necessary to fill all the gaps and recesses in the seams with putty. Hats from nails must be recessed in the wood.
- After the putty dries, we grind the surface again with sandpaper only 220 grit.
- We make a self-made coffee table. But before painting it is advisable to once again process the surface with 400 grit sandpaper.
- We install special plates on the lower supports of the cross members. When fixing the mounting plates, you need to watch so that the holes do not fall into the places of the screws already screwed in. The distance from the attachment point to the edge of the base of the table is about 2.5 cm.
- We screw the legs of the coffee table into the mounts themselves.
Stump coffee table
A self-made stump table fits perfectly into the interior in a rustic or ethnic style. Moreover, to find material for such a product is very simple.
Tools and materials
For the manufacture of such a product, the following materials and tools are required:
- white acrylic paint;
- manual grinding machine;
- hammer;
- chisel;
- wooden stump;
- nails for decorative upholstery;
- masking tape.
How to make a coffee table from a stump with your own hands:
- Find the basis for the table. The old rotten block for the table is not suitable, there should be a freshly sawn stump. Six months you need to wait for the stump to dry, and only when the bark is separated from the trunk, you can begin the manufacturing process.
- Using a chisel, clear the stump of the bark.
- Using a grinding machine and sandpaper of medium grain size, we grind the surface, remove the remnants of the bark and smooth out sharp corners.
- Wipe the tree with a damp rag.
- Primed the surface of the wood.
- We paint our product with white acrylic paint.
- Glue a strip of masking tape. The upper edge of the side surface along which the adhesive tape is pasted marks the location of the first row of nails.
- Hammer hammer the decorative nails of the first row. Next, we proceed to the design of the “line” of the second row, and then we drive in decorative carnations in the third row. Previously pasted masking tape serves as a guide for maintaining the distance from the studs to the upper edge. Approximately 140-150 decorative nails are needed.
to contents ↑Important! In order not to damage the flooring when moving the table around the apartment, it is desirable to beat the bottom surface of the stump with furniture felt material.
Plywood coffee table
You can also make a coffee table with your own hands from plywood and glass. For this:
- First, the dimensions are determined and a drawing is developed. After that, we proceed to the manufacture of a coffee table.
- A box with partitions made of plywood is used as a countertop.
- We close the manufactured box on top of the glass.
- We use thick enough plywood when cutting legs for a table.
Important! It should be borne in mind that making double legs is much easier than many single ones.
- We attach the triangular legs to the box made earlier.
- For convenience, the plywood box can be decorated with a door.
- The final step is dyeing or varnishing.
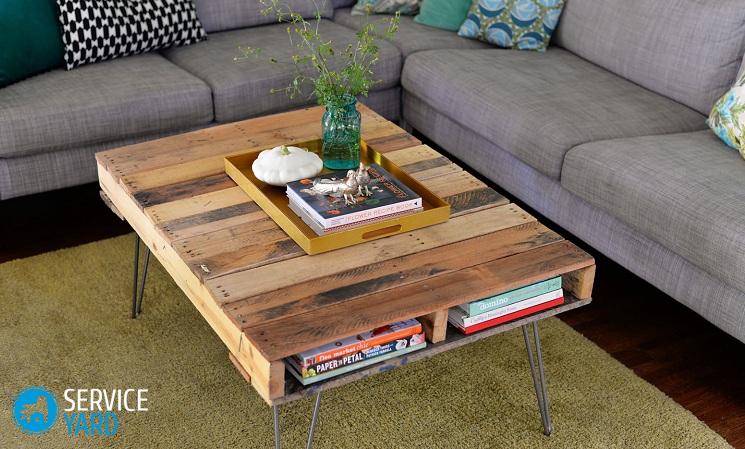
Coffee table of pallets
A variant of furniture that can be made with your own hands from pallets looks very interesting.
Option 1:
- First, the pallets are sanded, sawn into pieces and primed.
- A table is assembled from the prepared parts. To do this, attach the wheels or legs. The lid itself can serve as a lid, or you can use a part assembled from separate planks.
- When all the parts are connected, the structure must be painted or varnished.
- After drying, the table of pallets is ready.
Option 2
To make such a variant of the table, a part of one or two pallets is used:
- Pre-create a sketch of the future table, taking into account all sizes.
- We equip the table with a shelf for small items, which will be located under the countertop.
- When all the details are prepared, we assemble the desired design.
- The surface of the table is painted with paint.
- At will, we additionally decorate and decorate the finished product.
Nautical-style coffee table
To make a table, you can use the old window frame. This option looks very romantic.
How to make a sea-style coffee table with your own hands:
- We clean the frame from dust. If necessary, replace the glass.
- We paint the wooden surface of the frame with white paint on an acrylic base.
- When the paint layer has dried, we process the surface with sandpaper until the wood comes out. A blue and white color scheme is also possible.
- We make the legs from the handle, which we cut into 4 parts of 34 cm. To remove the roughness of the workpiece, we process the legs with sandpaper.
- The base of the legs is made of sawn scraps of furniture board. All irregularities are also removed with sandpaper.
- In four places we drill workpieces.
- We attach each leg to the base.
- We attach the base with legs to a wooden frame. We fasten everything with screws.
- We glue the legs with a rope of rough structure.
- We glue marine-themed souvenirs and all kinds of seafood on low-fat and peeled glass.Based on the size of the frame, we cut out glass in the workshop with which we close marine souvenirs.
- On one side of a rough rope we make a loop. Glue the rope around the entire perimeter of the frame while leaving the loop free. From the side of the second end we tie an interesting maritime knot.
- A nautical-themed coffee table is ready.
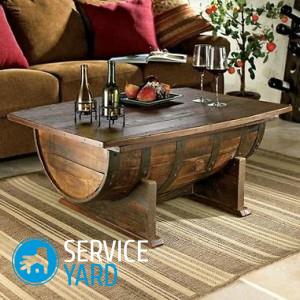
Log table
For a country house or cottage, a handmade table made of logs will become an ornament. How to make a coffee table from logs with your own hands:
- To begin with, we assemble the frame from sheets of plywood with a thickness of 2 cm.
- From the sheets we cut out the base of the table, which has dimensions 60x80 cm.
- We attach a box with a length of 68 cm, a width of 45 cm and a height of 40 cm to the cut-out base.
- Then we cut round logs in the amount of 30 pieces with a length of 45 cm and round saw cuts in the amount of 24 pieces, the thickness of which is 3 cm.
- We fix the prepared logs around the entire perimeter of the box.
- We attach rollers to the bottom surface of the base, set them at a distance of 3 cm from the edge of the product.
- We attach logs with glue. For reliable joining of logs, we additionally fix the screws on the bottom.
- On top of the box we install the plywood lid, on which we stick the rounds.
- Putty for wood fill the space between the logs.
Important! When dried, such putty does not shrink. It must be applied in stages, allowing the previous layer to dry.
- After drying of the last layer, the surface of the product must be sanded using a surface grinder.
Our table is ready to use!
to contents ↑Stock footage
As you can see, there are a lot of ideas for making a coffee table with your own hands. Which one will be yours depends on the materials available, the skills to perform such work, and the style of the interior of the room for which you want to make such a piece of furniture. Good luck!
- How to choose a vacuum cleaner taking into account the characteristics of the house and coatings?
- What to look for when choosing a water delivery
- How to quickly create comfort at home - tips for housewives
- How to choose the perfect TV - useful tips
- What to look for when choosing blinds
- What should be running shoes?
- What useful things can you buy in a hardware store
- Iphone 11 pro max review
- Than iPhone is better than Android smartphones
 (No ratings yet)