

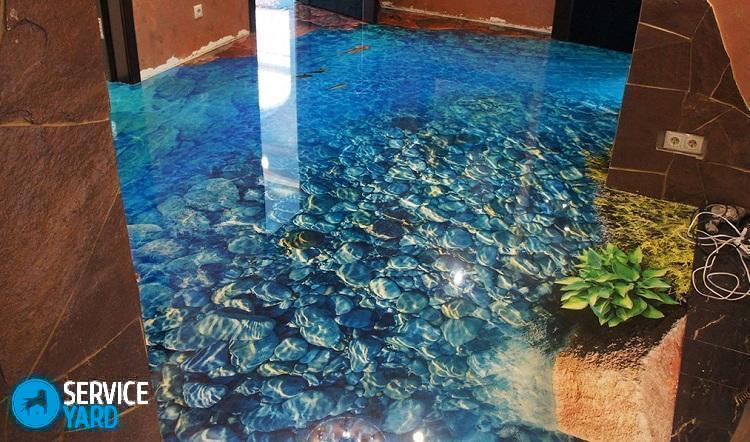
3d floor in the bathroom
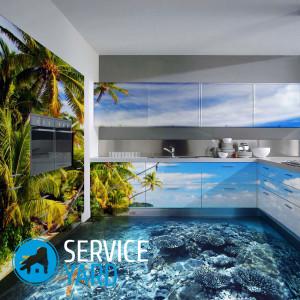
The bathroom is a place where we spend a certain amount of time performing daily hygiene procedures. Here we rest, getting maximum relaxation from working days. That is why you should pay special attention to the design of the bathroom. We suggest considering such a stylish design option as a 3d floor in the bathroom, which is gaining great popularity among lovers of high-quality and original coatings. Such floors with a three-dimensional effect can decorate not only the bathroom, but also the bathroom. 3D floor in the bathroom looks fresh and very unusual. Today we’ll talk how to make a similar floor with our own hands, so that the final result is no worse than the work performed by a professional.
to contents ↑Advantages and disadvantages
So, let's figure out what is a floor with a 3d effect. The base of the poured floor can be made of cement, polymers or epoxy. We want to note that the polymer mixture has a high degree of strength, wear resistance and versatility of use. Such coverage will be of the highest quality, for which you will need to pay a considerable amount of money. We will not be verbose, but simply list the advantages and disadvantages of 3d flooring.
Pros:
- Spectacular and unusual appearance.
- Perfect smoothness.
- Non-toxic coating.
- 3D floors in the toilet are quite durable, not subject to abrasion.
- On a monolithic surface there are no joints, which are sometimes very difficult to get rid of when installing a conventional floor covering.
- Non-slippery filler surface, which is especially important for a bathroom or toilet, where there is a chance of moisture getting on the floor.
- A room with such a coating will look modern and original.
- The improved technology thanks to what the monolithic floor of the highest quality turns out.
- Dust will not be visible on such a floor.
- Does not let water through.
- The material is non-combustible, very flammable.
- Acid and alkali will not stain the coating.
- Hypoallergenicity of polymer compositions.
- Resistance to burnout.
- Long term of operation (up to 20 years).
Minuses:
- The bulk floor dries for a very long time (up to 7 days).
- The difficulty of self-dismantling the coating.
- 3D floor in the bathroom requires special care. It must be cleaned with a special machine and detergent. It is with such competent care that the monolithic flooring will remain as transparent and shiny as at the very beginning of use.
- Only a skilled craftsman can complete the installation of such a spectacular floor at the highest level.
How to make a bulk floor with your own hands?
So, we came to the consideration of the most important issue - how to do the installation of 3d coatings with our own hands. First of all, to carry out such work, you need to be confident in your abilities, namely, you should be well versed in the technique of using construction tools and preferably the practice of coating. If you have good knowledge and experience, then you will need to prepare everything you need to complete the entire work cycle step by step.
Materials and tools:
- Drill.
- Construction mixer.
- Hammer drill.
- A grinder with a diamond disc or a grinding machine.
- Level.
- Roller with small needles.
- Roller with sintepon base with pile no more than 12 cm.
- Painting paints.
- Putty knife.
- Hair brushes for coloring hard-to-reach spots.
- Plastic brush for filling the monolithic layer.
- Primer mixture.
- Squeegee for leveling the primer.
- Film with a picture or decorative elements.
- Special protective footwear for walking on a covering - kraskostoy.
- Work clothes.
- Vacuum cleaner for cleaning.
The primer should not be ordinary, but intended for monolithic coatings. Using a cheap version of the mixture will not give the necessary adhesion of the floor surface to the base, which can lead to damage to all the work done. Most often, the bathroom and toilet have a concrete base, for the processing of which the acrylic or polymer primer will be most optimal.
Important! Do not forget that the length of the needles on the foam roller should correspond to the thickness of the monolithic floor layer. This is necessary to completely remove air bubbles from the newly laid solution. It is this nuance that affects the final appearance of the floor with a 3d effect.
Installation:
- Preparing the surface for future fill. We take out all the excess from the bathroom, remove the skirting boards, dismantle the floor tiles. If you plan to change communications, then at this stage you will need to cut old pipes that are 5 cm above the floor, clean them from rust and cover them with plastic plugs to prevent debris from entering them. Thoroughly clean the surface, vacuuming even the smallest particles.
- First, putty, and then - align the existing flaws.
- We use the level to mark the borders of our future fill.
- Well primed surface. Impregnate the base to form a homogeneous screed inside. Sprinkle with quartz sand a primed base. This should be done to better grip thick-walled bulk floors. Note that categorically it is impossible to leave clots of the mixture or untreated areas - the primer should cover the base with a smooth and even layer. The second coat of primer should be applied only after the first has completely dried. To dry each layer, you will need 5 hours at room temperature.
- Now glue the dried surface with a damper tape.
- We proceed to the breeding of a special mixture for pouring monolithic floors. Do not forget to read the instructions for its composition before starting work. It is following the exact instructions on the package that the polymer composition is bred. For uniform mixing of the mixture we use a construction mixer.
Important! It is strictly forbidden to mix the ingredients “by eye”. Do not forget that not only the speed of solidification, but also the appearance of 3d flooring depends on correctly selected proportions.
- Leave the mixture for a few minutes, mix again, and then fill the floor surface. We begin to pour the polymer solution on the floor in the corner farthest from the door. Now we pick up a roller with needles and begin to quickly roll out the mixture on the base. Do not forget to ensure that you get a uniform layer over the entire floor area. It is imperative to check the seams and corners along the walls, where voids can often form.
- Pour the finished solution onto the surface in horizontal stripes, moving towards the exit from the room.
- We lay out the vinyl pattern on the floor in the position we need. We bend the protective paper layer from the wrong side of the image, and then glue the adhesive film to the coating. Smooth everything thoroughly and level it with a roller, squeezing out all air bubbles from the film.
- We glue the fabric onto the final polymer solution. We pre-kneaded it, then poured it onto the floor, distributed it on the base with a roller, and then laid the canvas on top.
- Gently straighten the fabric and press it to the floor, rolling it with a foam roller. We perform actions moving from the center to the edges so that air does not collect under the canvas and we do not form bulges on a monolithic flooring. We walk on the polymer strictly in kraskhostah, which will not leave traces on the floor.
- Carefully cut and align the edges of the fabric at the exit points of the communications.After spreading the fabric, we again knead the polymer solution, with which we fill the working area. Leave to dry the floor after filling and rolling with a spike roller. This usually takes about three weeks - the drying period of the flooring depends on the composition of the monolithic flooring.
- We polish and wipe off a well-dried surface from dust. You can additionally cover the floor with a colorless protective varnish.
- We install plumbing in place, arrange accessories in places.
So we installed the 3d floor in the toilet with our own hands. Now you can fully enjoy its beauty!
to contents ↑Important! Note that each ready-made mixture has its own specific time of use. That is why it is desirable to prepare such an amount of solution that will be consumed at a time. Almost any solution sets in an hour. During pouring, the mixture in the container may thicken. You can’t categorically dilute it with water, but you just need to mix it thoroughly to the desired consistency.
Stock footage
Such floors are no longer a wonder, but have been used for several decades. Glossy 3d flooring has many advantages, unlike other types of flooring. Indulge in a particularly beautiful interior!
- How to choose a vacuum cleaner taking into account the characteristics of the house and coatings?
- What to look for when choosing a water delivery
- How to quickly create comfort at home - tips for housewives
- How to choose the perfect TV - useful tips
- What to look for when choosing blinds
- What should be running shoes?
- What useful things can you buy in a hardware store
- Iphone 11 pro max review
- Than iPhone is better than Android smartphones
 (No ratings yet)