

Rough floor screed
When arranging the construction of any base, a draft floor screed is an obligatory element. It plays the most important role - it allows you to level the floor, bring it to the desired level, to ensure the hardness and strength of the structure. You do not need to have any special knowledge or an expensive tool to make styling. The main thing is that the work is carried out correctly, without violating the technology and clearly according to the instructions. In this article we will talk about all the subtleties of this process.
to contents ↑Ground flooring
Most often during the construction of private houses, flooring takes place directly on the soil. In particular, this is due to the simplicity and low cost of installation work. In most cases, to create a rough floor on the ground, concrete is used, since it has a number of advantages in comparison with other materials:
- Low cost.
- Mechanical strength.
- Accessibility.
- Long service life.
In order for the concrete floor to be poured on the ground reliably and efficiently, it must necessarily include the following layers:
- Prepared soil.
- A mixture of gravel and sand.
- Waterproofing material.
- Draft screed.
- Insulation.
- Concrete screed.
- Topcoat.
Important! This design can undergo changes - it all depends on what properties the soil has on a particular construction site, the type of topcoat used and many other factors also play a role.
It should be noted that in case of screed pouring on the ground, it must comply with the following conditions:
- Be completely dry.
- To be motionless.
- Groundwater level should not exceed 4 m.
What preparatory work needs to be done?
An independent rough screed is made using the following materials and tools:
- Electric drill with a special nozzle for mixing concrete mix.
- Vibrating plate.
- Building level.
- Concrete vibrator.
- Guides.
- Rules.
- Trowel.
- Tanks for solution.
- Shovels.
- Cord.
- Cement.
- Waterproofing material.
- Sand.
- Gravel and rubble.
- Armatures.
Important! It is possible to engage in the construction of the floor only after the construction of the walls is completed and the ceilings are installed.
Perform the preparation according to the instructions:
- Mark up, mark the zero level so that it coincides with the bottom plane of all door frames.
Important! Marks must be made on all walls of the room. To simplify your work, you can pull the cord around the entire perimeter of the room.
- Then prepare the soil for pouring. Remove all building debris from the building, remove the topsoil of approximately 35 cm. This thickness will have a floor that looks like a multi-layer cake.
- Then seal the base with a vibrating plate. That is, you need to compact the soil in order to get the maximum even and dense foundation for pouring.
Important! You can additionally lay a layer of clay and sand on top of the soil to improve the performance properties of concrete. At the same time, clay is compacted and moistened a little to get good waterproofing from groundwater.
- Top soil should be covered with gravel. Its thickness should be 5-10 cm. It is wetted with water and carefully packed.You can use wooden pegs with special marks to control the thickness of the soil layers.
- Then fill and compact sand 10 cm thick.
- Sand on top with a layer of crushed stone, previously moistened with water.
- Then sprinkle everything on top again with sand.
How to independently waterproof, reinforce and install guides?
At the next stage, the rough screed should be protected from soil moisture through waterproofing, it is necessary to reinforce and install the rails.
It is necessary to perform the following types of work:
- Overlap a plastic film and a polymer membrane or bitumen to ensure the proper level of thermal insulation.
- Glue all connection points with mounting tape.
Important! At the same stage, it is better to insulate the base with basalt wool, expanded clay, extruded polystyrene foam or perlite.
- To increase the reliability of the subfloor, reinforcement should be performed. You can use a plastic or metal mesh, reinforcement or wire for this. The reinforcing frame is placed on supports approximately 2-3 cm high. The reinforcement located in the concrete body will ensure its strength.
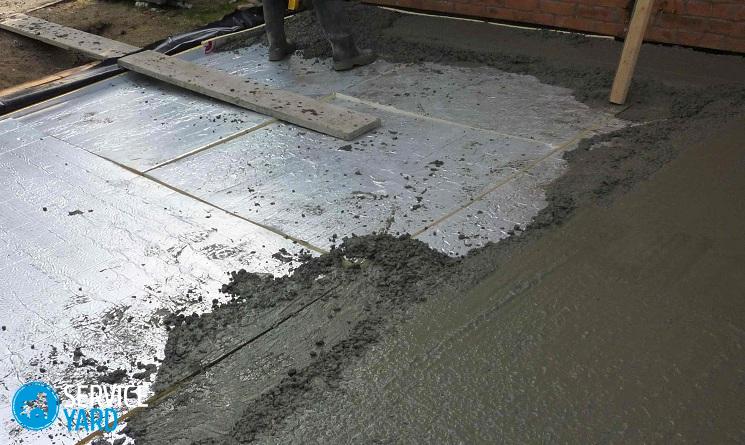
- Next, lay the guides made of metal pipes or wooden blocks to keep the screed horizontal. They are fixed with a thick cement mortar.
- Then install the formwork between the rails. As a result, you will get rectangular zones into which it will be convenient to pour concrete.
How to do the filling of the rough floor with your own hands?
The subfloor must be poured in one go, otherwise you will not be able to get a structure with the required strength. It is better to order ready-made concrete for this, which will be delivered to you at the construction site by a special machine. But if you want to save money, you can make a concrete mix yourself from crushed stone, sand and cement in a ratio of 4: 2: 1.
Fill, adhering to this technology:
- Start pouring from the corner of the room, which is located directly opposite the door.
Important! You must try to fill concrete with several zones at once. You can use a concrete vibrator to make the mixture sit better.
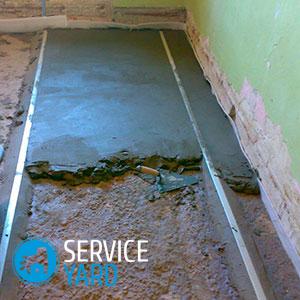
- Then, using the rule that was previously set on the rails, level the rough screed.
- Where alignment is already completed, remove the guides and formwork, fill the voids formed with concrete.
- Cover the base until the concrete has completely dried with plastic wrap.
- Spray the floor periodically with water so that it does not crack.
Stock footage
We described in detail how the subfloor is poured on the ground, the sequence of all actions, which means that problems should not arise during the work. In terms of horizontality, as a rule, they do not impose strict requirements on the rough basis, because any defects can smooth the finish.
- How to choose a vacuum cleaner taking into account the characteristics of the house and coatings?
- What to look for when choosing a water delivery
- How to quickly create comfort at home - tips for housewives
- How to choose the perfect TV - useful tips
- What to look for when choosing blinds
- What should be running shoes?
- What useful things can you buy in a hardware store
- Iphone 11 pro max review
- Than iPhone is better than Android smartphones
 (No ratings yet)