

Decorative plaster rain
Decorative plaster is an excellent solution for decorating walls. Many believe that this method of decoration is very expensive. Naturally, there are expensive imported mixtures on sale, but they are intended for professionals who know how to work with them. Today we will talk about affordable options that anyone can easily put on the walls on their own. Consider such popular types as decorative plaster rain and rock.
to contents ↑Types of structure
Decorative plaster is great for decorating walls in rooms.
Structural plaster has the following varieties:
- The rain.
- Rock.
- Textured stone plasters.
- Bark beetle.
- Flock.
- With marble chips.
- Venetian.
Consider the two most common inexpensive types of interior decoration - rain and rock.
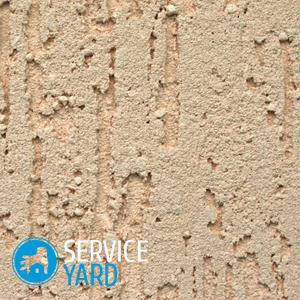
to contents ↑Decorative plaster rain
To create the effect of rain on the wall, you must first prepare.
Necessary tools and materials:
- Trowel.
- Putty knife.
- Roller.
- Ironing.
- Drill with mixer tip.
- Capacity for kneading.
- Dry mix.
- Water.
- Masking tape.
Phased steps:
- Rain decorative plaster cannot be applied to painted walls or old wallpapers. Therefore, the surface is cleaned of old coatings. The wall should not be perfectly smooth, but even.
Important! Small defects will help to hide structural decorative plaster.
- A dry surface is then coated with deep penetration primer so that the adhesion of the mortar to the wall improves.
- After drying, the solution is kneaded. To do this, pour the dry mixture into the container, add water according to the instructions. Stir everything with a drill to get a thick mixture without large lumps.
- A solution is applied to the wide trowel with a small spatula, transferred to the wall with a slight pressure from above, and leveled with a thin layer of about 3 mm.
- It is carried out with a ironing machine vertically from top to bottom along the entire working surface of the wall to create rain plaster.
Important! Remove mortar from the ironer using a dry spatula after each such wiring.
- They pass along the wall twice - the solution will dry out and will not greatly change the structure, but the effect of the rain will be more expressive.
Application Tips:
- It is best to apply the rain structure at an angle. To do this, draw on the wall as wide as three smoothing lines, inclined lines at the same angle.
- Stick masking tape on each line so that its lower edge lies on the line.
- Apply plaster from the top corner.
- Spread putty on a strip as wide as the size of an iron and about a meter long.
- Lightly press and pull the line in the elevated state of the ironer to create the effect of drops. This action is repeated until the entire strip is covered.
- Each next strip is overlapped on the previous one.
- The last strip will protrude onto the masking tape - it is necessary that in the end result, at the junction, the layers crawl one on top of the other and the appearance is beautiful.
Important! When embarking on a job, be sure to finish the wall, because a break will lead to a noticeable difference between the layers.
- When the decorative plaster the rain dries, to remove small irregularities, process it with an abrasive sandpaper or mesh.
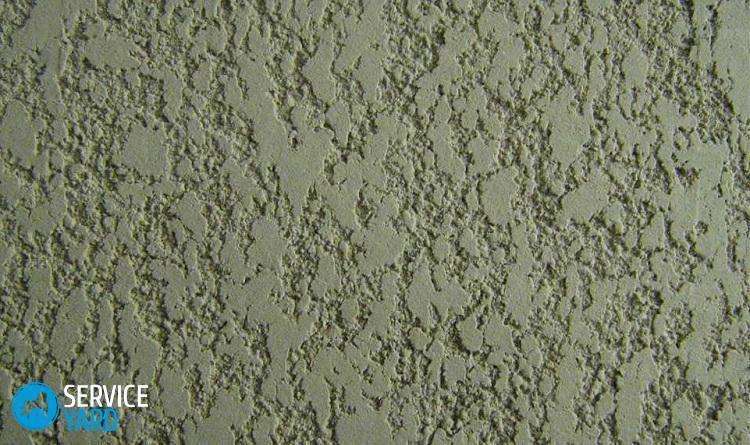
Decorative stucco rock
Decorative plaster rock is the easiest way to apply and is perfect for beginners. You do not need to buy a special mixture for work - you can use a finishing putty based on cement or gypsum.
Important! For the walls of the bath, toilet and kitchen, only decorative cement-based plaster is suitable.
The process of doing the work:
- Before applying decorative plaster rock, smooth the walls. Plus, to improve the quality of the coating, it is advisable to apply a layer of putty.
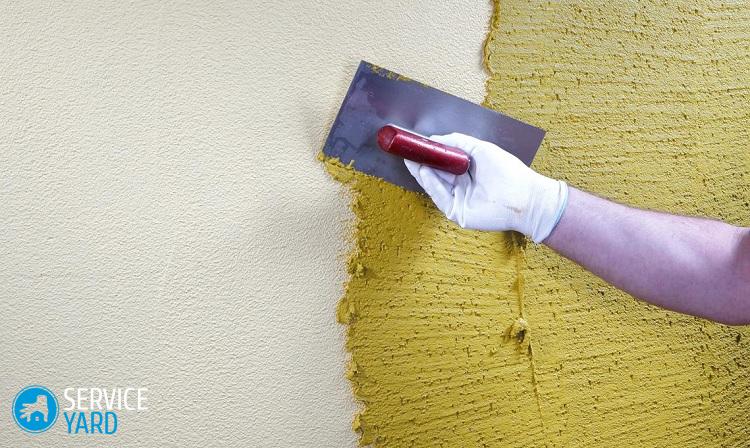
- Type putty on the ironer and apply to a small area of about 0.5 square meters. m. a layer of about 3 mm. The thicker the layer, the texture will be rougher.
- Spread the mortar evenly over the wall and start creating a pattern. To do this, clean the trowel and press it against the wall on a fresh putty, tightly, while lifting the lower edge of the trowel, and make a downward movement at the same time.
- Having finished the first section, proceed to the second. Do this with an overlap so that no gaps remain.
- Leave to dry for at least a day, and after that - proceed to further painting.
Application Recommendations:
- To create a picture, you can use different movements of the ironer. For example, crosswise, herringbone, horizontally or vertically.
- Tear the trowel smoothly from the solution so that no traces remain.
- Smooth the surface and start over if something doesn’t work out.
- Clean the ironer after each application on the mix.
- Avoid sudden changes that can be immediately apparent.
Plaster painting process
Decorative plaster rain or rock with your own hands after drying needs to be painted.
Phased implementation:
- Prime the surface before painting.
- It is best to use two colors to highlight the structure. You can apply one of the methods of applying paint - wash or dry brush. Application of paint by washing will emphasize all depressions, and dry brushes - protrusions.
Important! For rain, only a washout is suitable, for a rock - any of the options.
- Apply the background color in several layers with a long-nap roller.
Important! The paint consumption will be greater than its amount for application to ordinary walls without texture.
- To highlight the relief with a wash, use the dark colors of the paint, with a dry brush - light shades.
Important! Waterproof paint is better for washing method, for a dry brush - any.
Let us consider in more detail each method.
Paint wash
This is a more sophisticated method of applying paint.
It is executed as follows:
- Apply another darker coat of paint to the wall.
- After a while, wipe it with a wet rag. The recesses will look darker than the bulges.
The technology is simple, but requires physical and time consuming.
Important! Use a non-moisture resistant paint for the second coat, as it is easier to wash off.
Dry brush painting
In order for the decorative plaster rock or rain to be painted by this method, it is necessary to prepare:
- Paint bath.
- Flat wide brush.
- Pieces of cardboard.
Stages of the work:
- Pour the paint into the bath and dip the brush into it. Wipe it first on the bath and then on a piece of cardboard so that there is no excess.
- In different directions, gently apply paint to the plaster.
to contents ↑Important! Keep the brush parallel to the wall - it should barely touch it and make chaotic movements, as if you are wiping off the rest. Avoid sharp transitions of traces and colors from the brush.
Applying varnish
Necessarily painted plaster rock and rain is varnished at the final stage. This is necessary for a richer and brighter color, as well as additional protection.
You will need:
- Lacquer.
- Water.
- Wide brush.
- Paint bath.
The process consists of the following actions:
- Dilute the varnish with water in a ratio of approximately 1: 1.
- Apply varnish to the surface with a brush.
- Let it dry a little and apply the next coat.
Important! To avoid smudges on the wall, squeeze the brush on the edges of the paint tray.
After complete drying, you can glue the ceiling plinth to give the room a finished look.
to contents ↑Stock footage
Decorative plaster rain or rock can be created with your own hands without any problems. You will end up with a unique and unique finish. Following the entire process described above, you will get a wall covering that will last you many years. Create your own unique design.
- How to choose a vacuum cleaner taking into account the characteristics of the house and coatings?
- What to look for when choosing a water delivery
- How to quickly create comfort at home - tips for housewives
- How to choose the perfect TV - useful tips
- What to look for when choosing blinds
- What should be running shoes?
- What useful things can you buy in a hardware store
- Iphone 11 pro max review
- Than iPhone is better than Android smartphones
 (No ratings yet)