

How to glue tiles in the bathroom?
The vast majority of apartment owners, faced with the question of how to finish the walls of the bathroom, prefer tile. For rooms with high humidity, ceramic tiles are just perfect. If it is correctly selected and fixed, the room will be both beautiful, and convenient, and safe. The article will discuss how to glue the tiles in the bathroom so that the finish of the bathroom is fully consistent with its purpose.
to contents ↑Where to begin?
To answer the question of how to glue tiles in the bathroom, you must first have this tile. And not only her, but also a lot of other things - materials and tools. First you need to determine the number of tiles and estimate the type of tile.
Important! As for the sizes, everything is quite simple here - in small bathrooms you need small squares or rectangles, in spacious ones - you can glue any, including figured tiles.
The surface of the tile can be:
- matte;
- glossy.
to contents ↑Important! Glossy looks more impressive, but on the matte there are less visible drips and drops, which almost always appear on the walls in the bathroom. But with proper care, this little flaw can be avoided.
We calculate the amount
First you need to calculate the surface area to be faced. For example, the wall area is calculated according to the most common formula:
- multiply the length by height;
- determine the area of all other planes;
- add up the results;
- divide by the area of one tile;
- add another 10-15% to the amount obtained.
Important! A supply is necessary, because in some places you will probably have to lay not whole tiles, but halves or even quarters. Plus, you should take into account possible damage.
Here it must be clarified that the tile is sold in square meters. But you may need other elements:
- panel;
- border.
They are sold individually, although the area is also indicated for the panel.
to contents ↑Important! When buying, be sure to check the batch numbers on the packages. They must match.
How to fix it?
Tile needs to be glued on something. In addition, the wall should be as flat as possible, and the joints should be clean and tidy. Accordingly - some more materials will be needed:
- deep penetration soil;
- cement-based grout;
- tile adhesive;
- "liquid Nails".
Important! In addition, it is possible that the wall under the old finish is not as good as you would like, and you will have to level it, so putty will be needed. However, you can get out of the situation in another way, if you have already started a major overhaul. An excellent base is a cement slab. This, of course, will cost more, but the result will be more effective.
Instruments
Is it possible to make high-quality repairs without a trowel and brush? Of course not. Therefore, make sure that everything necessary for gluing tiles in the bathroom is always at hand:
- hammer drill;
- chisel nozzle;
- drill;
- mixer nozzle;
- brush for the ground (macrocloth);
- 2 metal spatulas of different widths;
- rubber trowel for grouting;
- metal graters for tiles;
- roulette;
- level;
- rubber mallet.
We begin preparation
Repair of the bathroom is carried out gradually:
- A rough floor and screed are made.
- Plumbing is installed.
- Tiles are glued to the floor and walls.
That is, by the time you become interested in the question of how to stick the tiles in the bathroom with your own hands, the bathtub and washbasin should take their places. It will be very disappointing if they suffer from your inept actions. Therefore, they must be protected, like brand new cranes. For this we need:
- thick plastic film;
- cardboard;
- Scotch.
Important! The film is sold in stores selling goods for gardeners - it is made of greenhouses. It has a large width, so a couple of meters is enough for the eyes. Cardboard is suitable for any, including packaging, any box will do.
Here is what you need to do:
- Cut a piece of plastic film so large that it completely covers the font.
- Attach polyethylene tape with tape in several places.
- From cardboard, make covers like those that sell light bulbs, only more, and put them on taps.
What are your walls lined with?
After everything is bought, the plumbing is installed and even securely closed, it is time to tackle the walls themselves. This is where the fun begins. The answer to the question of how to glue the tiles in the bathroom on the wall, largely depends on what the wall itself is made of. She may be:
- wooden;
- concrete;
- drywall;
- from chipboard;
- brick.
Great options are brick and concrete. You don’t need to do anything special, just level the surface, and then you can safely glue the tiles in the bathroom. It is much worse if the surface is wooden or from chipboard, or even from ordinary drywall or fiberboard (this also happens). In these cases, it is very useful to put a cement slab or a panel of moisture-proof drywall. The cement slab is especially good in the old house, where the walls already have a finish that will have to be removed. If the wall is dilapidated, the cement slab will not save - it does not strengthen the surface, but only relieves you of the need to level it.
Important! Plywood is not suitable for leveling the wall in the bathroom, since this material does not tolerate humidity and high temperature.
Put the stove
To install a cement slab, you will need several things:
- the stove itself (sold in construction stores by area);
- grinder or knife.
- paint net;
- marker;
- long straight rail;
- roulette.

The first step is to cut the stove to size. This is done in the usual way:
- The plate has right angles, and it’s absolutely the same as how to cut it, so from one of the corners set aside length and height on adjacent sides.
- Draw perpendiculars to the marks to the intersection.
- Check line parallelism and angles.
- With a knife, groove along the marked lines to a depth of 2 mm.
- Break the plate - it will break evenly.
You can also saw it with a grinder, only then you will have to immediately prepare a vacuum cleaner - there will be a lot of dust. There are two ways to mount:
- based;
- on the frame.
Inevitably, the question arises which side of the slab should be adjacent to the wall, and on which tile will be glued. In any case, it is more convenient to glue the tiles on a rough surface. But there are exceptions - for example, mastic perfectly clings to a smooth plane. Self-tapping screws are screwed to the frame or base of the DSP, the pitch is 15-20 cm.
to contents ↑Important! If the plate is composite, the fragments should not adjoin closely to each other - there should be 3 mm gaps between them, and the seams should be glued with a paint net, and then with fiberglass tape.
Straight to the wall
Having decided to do without a cement slab, get ready for a rather laborious and dirty work. Before gluing the tiles in the bathroom, you have to deal with the wall:
- It is necessary to remove the old finish, and as carefully as possible: if the tile is well glued, it will have to be broken, and the remaining fragments removed with a puncher.
- It makes sense to carefully inspect the wall, and in some cases even tap it, so that poorly lying plaster is crumbled and only fragments remain that hold securely.
- All recesses and depressions must be thoroughly puttied.
- After the wall dries, do not forget to sand it.
- To improve the adhesion of the tile to the wall, apply a layer of deep penetration soil, preferably with antifungal components.
- Let the soil dry.
- Apply another coat of soil.
- Level the wall again.
- Check for vertical deviations - so that the tile holds well, the wall should be skewed.
Room preparation
Actually, you don’t need to cook anything special - the bathtub is already closed, and neat covers are put on new taps. But we must take care that after the repair in a couple of months it is not necessary to redo everything. To do this, make a waterproofing layer around the bath. As for the remaining sections, it all depends on the specific conditions - in most cases, you can do without additional waterproofing.
Last preparations
Good preparation is half the battle, but everything needs to be brought to an end. The time has come to do the tiled proper.
The tile should lie flat, while it is desirable that whole elements are visible, and the halves and quarters are somewhere in the corners where x is not so clearly visible. But the question remains open: what can be glued tiles in the bathroom? If you did not buy glue at the same time with the tile (and this is the best option), it's time to do it now. The store will offer you a dozen or two packages, the compositions are not much different from each other, so choose the one to which the most understandable instruction is written. The consideration is simple - if the manufacturer cares about the client to such an extent that he provides his goods with extremely clear leadership, he cares about his reputation and produces good quality goods.
to contents ↑Getting started
Each novice master cares about how to glue these beautiful squares or rectangles so that they do not fall off and stand straight? By half, you already provided this when you leveled the wall. Now just a little remains. In order for the tile to lie evenly, you need to mark the wall into zones - best of all, squares or rectangles of the same size. It should be marked by level, carefully checking the parallelism of the lines:
- Check if the horizontal row will consist of whole tiles or if clippings will be needed - just lay the tiles along the wall, without smearing them with glue.
- If the integer number of tiles does not fit, move the row.
- If the whole amount is stacked again, mark the row so that the halves or quarters are not visible.
Important! Never check the horizontal lines of the bathtub - it is specially placed at a certain angle, so that the rows will be curved.
In what order to glue?
So, you have everything marked up, the number of tiles in the row is determined - what's next? And then - decide where exactly you will start gluing. Experienced craftsmen recommend starting from the center, especially if you have a panel. But for this approach, you need to very carefully calculate the number of rows.
Important! There is another way - from the far lower corner.
Spread glue
Try to correctly calculate your strength. How many tiles can you stick in a day? The amount of cement-based glue to be diluted depends on this. The compositions are different, but the packaging must necessarily indicate that the adhesive is suitable for interior decoration with tiles.
There may be some deviations in the method of preparation, but usually the procedure is as follows:
- Pour 0.25 liters of warm water into a clean container.
- Gradually pour 1 kg of glue mixture, mixing thoroughly.
- Stir until the mass is homogeneous.
- Leave the glue to stand for about five minutes, so that it swells.
Important! Why is it necessary to prepare the strictly necessary amount of glue? Because most often the composition retains its properties for about four hours. So it’s better to dilute a little, and if you later want to work harder, make a new batch. On sale you can find ready-made adhesives and mastics.It is not necessary to breed them, but they cost more than dry ones.
And then, finally ...
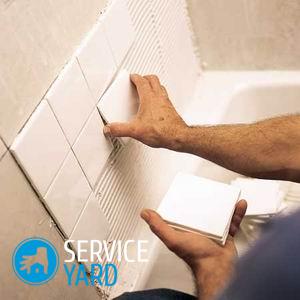
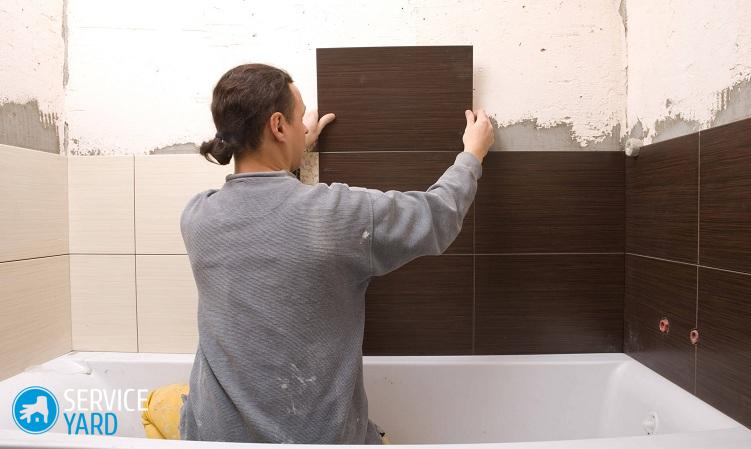
Actually, there’s nothing further complicated - take it and stick it on. However, it is better to adhere to some rules, this greatly simplifies life and improves quality:
- Glue the tiles in small areas strictly according to the marking.
- When individual elements are larger or smaller than the rest, the rows can turn out to be even if the seams are made wider or narrower.
Important! In order to control the process, there are plastic crosses, they set the direction to the vertical and horizontal rows.
- To make the row even with respect to the font, you need plastic wedges - they are bought in the same department as the crosses.
Important! Experienced craftsmen recommend a new tile alignment system for beginners - it increases repair costs, but the results are perfect.
What to apply glue on?
In some cases, tile is smeared with glue, in others - a wall. This is indicated in the adhesive instructions. But, whatever composition you choose, consider some of the features of the material you work with:
- Apply glue to the tile or wall.
- Level the layer with a trowel and comb.
- If you applied the glue immediately to a large area, and it began to dry, scrape it off and apply a new layer.
- Press the tile.
- Check its position (a short bubble level is convenient).
- Glue the following tile.
- When the row is ready, check it with a long level.
- If the tile protrudes above the plane, level it with a rubber mallet: generally periodically tap on the wall where it is already lined - by the sound you will find out whether there were voids under the tiles or not.
- Remove excess glue immediately from the seams.
If you need halves
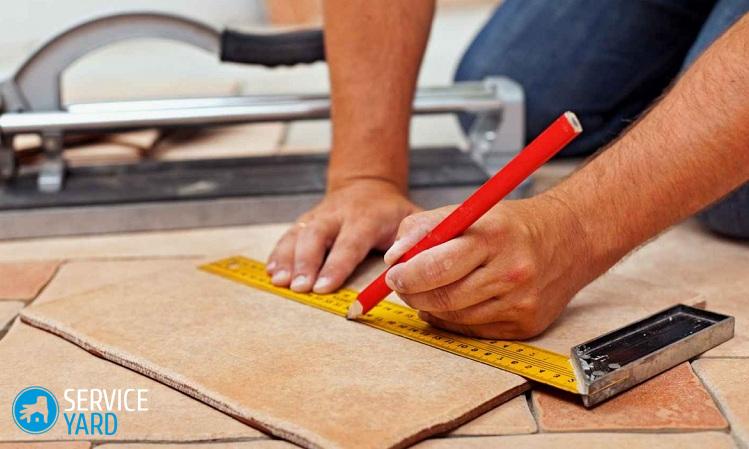
It rarely happens that a whole number of squares fit on the wall. Usually several tiles have to be cut. Than? To do this, there is a manual rail tile cutter:
- Mark the line to be cut.
- Make a scratch.
- Divide the tile - it's pretty easy to do.
In addition to the tile cutter, there are other tools that allow you to cut out tiles from tiles:
- drill with a ballerina nozzle;
- tile cutters.
Grout
Did you stick the tiles? Great, but that's not all. It is necessary to tidy the seams, and before that - wait a day until the glue finally sets. The compositions used are:
- on a cement basis;
- epoxy based.
As for color, here, as they say, options are possible. It is best to make seams in tone or a little lighter than tile:
- Dilute the mixture as described in the instructions.
- Put it on the seams (a rubber spatula is used for this).
- Wait until the mixture begins to harden - this will happen in about a quarter of an hour.
- Grind the seams.
- Remove excess with a sponge.
- Fill the seam between the bathroom and the wall with silicone sealant.
to contents ↑Important! If you are repairing for the first time, cement grout is more suitable for you.
Stock footage
Tile bathing can, of course, be entrusted to specialists. But then it will be necessary to include in the budget the corresponding items of expenditure, and you may not like them. The presence in stores of a large number of building materials and necessary tools makes repairing the bathroom a completely affordable affair, and the result entirely depends on how much you follow the technology.
- How to choose a vacuum cleaner taking into account the characteristics of the house and coatings?
- What to look for when choosing a water delivery
- How to quickly create comfort at home - tips for housewives
- How to choose the perfect TV - useful tips
- What to look for when choosing blinds
- What should be running shoes?
- What useful things can you buy in a hardware store
- Iphone 11 pro max review
- Than iPhone is better than Android smartphones
 (No ratings yet)