

How to make a warm floor from heating?

Many owners of apartments and private houses now abandon the traditional methods of heating their homes, when the only source of heat in the room is the battery. Increasingly popular are modern options that allow you to evenly warm the entire room. In the article we will tell you how to make a warm floor from heating.
to contents ↑What is a warm floor?
There are several ways to heat your apartment from below:
- water floor;
- electric heating;
- infrared coating.
A water floor is actually a central heating pipe, laid horizontally and closed on top with concrete and finish. In electrical systems, heating elements are placed under the coating, and infrared itself is a coating of a special material. Before you make a warm floor from heating, try to understand its advantages and disadvantages.
to contents ↑Why is he so good?
The undoubted advantages of the water floor include the following:
- It distributes heat better than ordinary batteries - the room warms up more evenly.
- It is pleasant to walk barefoot on the warm floor, and this is especially important if there are small children in the house.
- If you have meters installed, you will very soon see that using a warm floor provides some savings - although for those who pay for heat and hot water according to the standard, this is not particularly important.
- You can adjust the temperature - just turn off or connect individual circuits for this.
- There are fewer drafts in the room, much less dust accumulates on the floor than, say, behind batteries or in between separate sections.
- Radiators do not always fit into the style of the room, but there are practically no such problems with the floor - you can choose any kind of coating.
Important! If you think how to make warm floors from water heating, the pluses include the fact that when the pipes are laid under the tiles, you do not run the risk of catching a cold, as it sometimes happens when a person steps on a cold tile after a hot bath.
Talk about the flaws
When undertaking any reorganization, it is necessary to take into account the shortcomings that you will have to face. So, when deciding how to make a warm floor from heating with your own hands, consider the inevitable disadvantages:
- By itself, sex is not cheap, it is much more expensive than putting ordinary batteries.
- The pipes are heated quite strongly, so it is important to choose the right cover - the wood and laminate are not suitable, you can use only tiles, some types of linoleum and carpet. In any case, finishing materials and technology for laying a warm floor should be combined.
- Installation of such a floor is a long and rather dirty business, so it is better to do this with a major overhaul.
- We need a very reliable waterproofing, because the pipes sometimes leak.
- In the event of equipment failure, you have to disassemble the floor completely or in fairly large sections.
- Such a floor can only be done in rooms with good thermal insulation.
to contents ↑Important! If you intend to install a similar system in a city apartment, you should get approval from the local administration, since your innovation can affect the state of heating networks in the whole house.
What and how much?
A good plan is half the success of even such a crucial undertaking as remodeling the bathroom floor. If you suspect that you have a large heat leak, consult a specialist. But, in principle, it is possible to make approximate individual calculations.
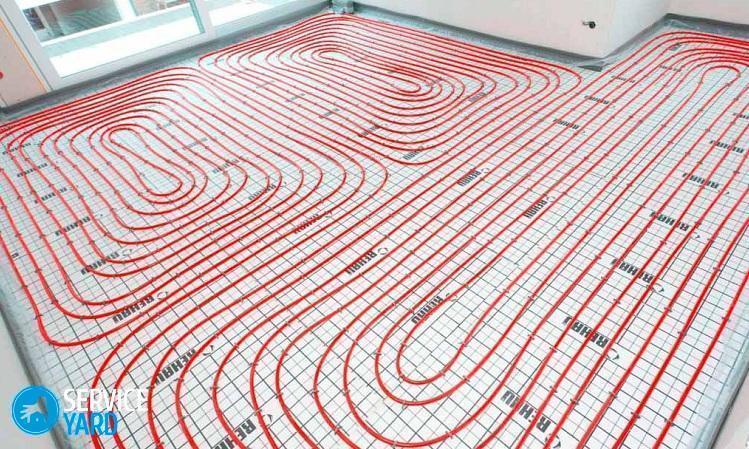
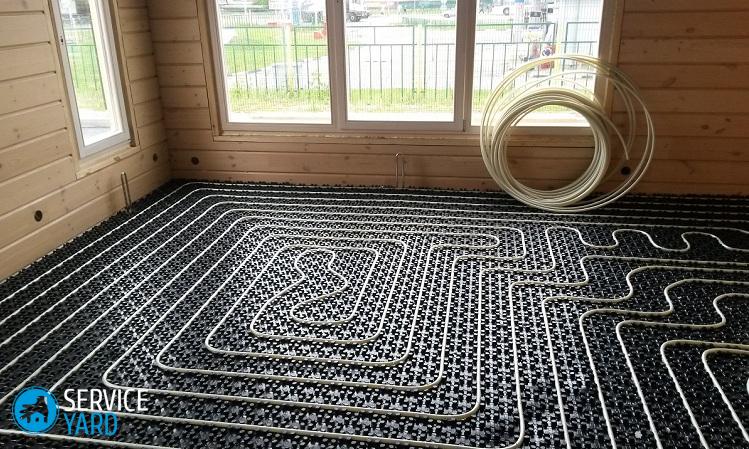
To get started, select a pipe layout. There are a lot of them, but the most popular are:
- snail;
- the snake;
- combined.
Important! From the names it’s clear how the pipes fit. The snail is a spiral arrangement, from the center. A snake means that the coolant is located with bends. With the combined scheme, pipes are laid in a spiral in one half of the room, and with bends in the other. Draw a plan of how the pipes will be arranged - it is most convenient to do this on a sheet in a box, choosing a certain scale.
If you live in a temperate climate and make the floor in the bathroom, you can safely proceed from the following considerations:
- The distance between the pipes can be 15-20 cm.
- In a cold room (when the walls do not have reliable thermal insulation), the distance should be less than 10 cm.
- In a large bathroom with uneven thermal insulation, you can use a variable step - in the coldest part, lay pipes at a minimum distance from each other, in the rest - depending on the quality of the walls.
The basis
Do-it-yourself underfloor heating can be qualitatively done only if there is a reliable foundation. It depends on how the house is built. The basis is used:
- concrete screed;
- lite option.
to contents ↑Important! Concrete screed is suitable for urban apartments and most private houses, if we are talking about a concrete foundation or a sand cushion. But for houses with wooden floors, this method is not suitable, there is usually used a lightweight version.
We go shopping
After weighing all the advantages and disadvantages, having decided on the scheme and the approximate number of pipes, you have strengthened your decision and understand how to make a warm floor in a private house from the heating system? Well, the next step is to purchase the necessary materials.
You need:
- pipes;
- temperature regulators;
- damping tape;
- plasticizer;
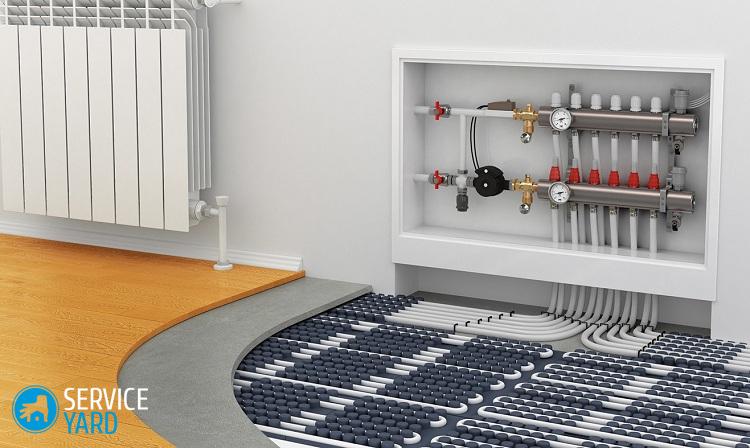
- collector group;
- insulation (multifoil);
- polystyrene foam.
Important! Going to a hardware store to see if there is everything you need and in what form, keep in mind that pipe pieces will not suit you. You need a single piece of a certain length, and no more than a hundred meters.
It may happen that your room is cold and large, so it will take several circuits. Each needs a separate pipe, and also no longer than 100 m. Why such a restriction? The coolant comes at a certain speed. If you need to increase this speed, as happens with pipes that are too long, you will need to increase the pressure. And this is not every material withstand.
What pipes are needed?
The best material for a warm floor is a metal-plastic pipe with a cross section of 16 mm. It bends perfectly, and it is easy to get bends of a very small radius. You can, of course, use polyethylene, but it is not so plastic - to bend it requires quite a lot of effort.
If we talk about the diameter, then the larger it is, the thicker the concrete slab should be, and this, in turn, will lead to a decrease in the efficiency of the entire system. The flow rate of the pipe is calculated at approximately 1 square. m area:
- for a step of 15 cm it is about 7 m;
- for a step of 10 cm - 10 m.
to contents ↑Important! Plastic is sold in bays. When laying, the bay rolls out immediately along the path defined for it, which must be prepared in advance.
Thermal insulation
As you know, the heat from the pipe goes in different directions. This is not particularly important if you have radiators. But when you make the floor, the direction should be strictly defined - the heat goes up, not down. That is, you need a heat insulator. In this capacity, foam is most often used.
The density of the insulation should be at least 25 kg per cubic meter, but the ideal option is 35 kg / cubic meter. m. Pay attention to the thickness - it should be at least 5 cm. If your house is cold or the bathroom is located in a room that is directly on the ground, it is better to make the layer thicker - 10 cm.
Screen
A reflective screen is always laid on top of the insulation - it is needed to further reduce heat loss. As a screen are used:
- penofol;
- special foam rubber;
- food foil;
In fact, any screen is a metallized film. Penofol is a foamed polyethylene with a foil coating - it is often used for wall insulation. A foam screen will cost less, but it is less reliable. Finally, you can use food foil - cheap and cheerful, but you definitely need protection, because it is destroyed from contact with concrete.
Protection
In principle, any screen needs protection. Make it easy. For this purpose, a greenhouse film, which is sold in stores for gardeners, is suitable. It should be quite thick - 75-100 microns.
Important! In addition to protecting the screen, the plastic film has another function - it provides proper humidity, especially when the screed dries.
When laying, pay attention to the following points.
- The film is glued with pieces that should overlap.
- The joints should be properly glued with tape.
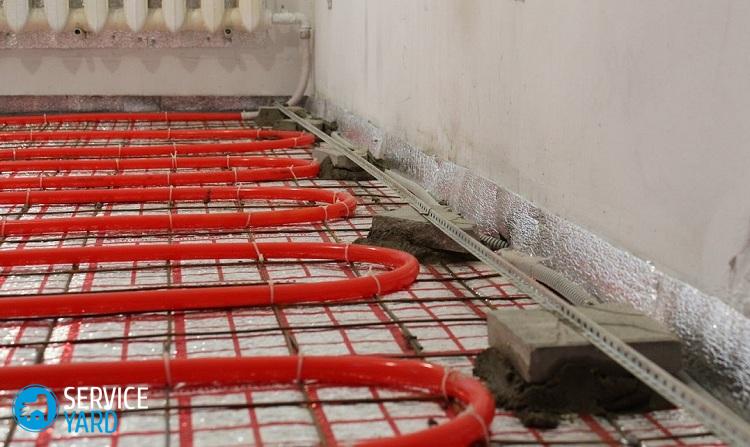
Fasteners
To qualitatively make a water floor, you will need, of course, fasteners. It is placed on a layer of thermal insulation. He must combine neighboring branches and prevent them from dispersing. All turns should be located as you have on the plan, otherwise - you are unlikely to be able to ensure an even distribution of heat. In essence, these elements are designed to make your life easier - they should stand while the screed is drying. In this capacity are used:
- metal strips;
- metal grid;
- plastic staples.
What to use depends on the conditions:
- You cannot do without metal strips if the concrete pillow is thick. Their task is to raise the pipe above the heat insulator layer. The principle of operation is simple - the pipe is clamped in the recesses.
- The metal mesh is good in that it is both a fastener and reinforcement. The pipe is attached to it with clamps or pieces of wire. The quantity is calculated, depending on the length of the pipe - for each meter 2 grids are required.
- The easiest and cheapest option is plastic staples. With their help, the pipe simply pins on the insulation. But this option is not suitable for all cases. In order not to do this work manually, you can rent or borrow a special stapler. Buying it is impractical - of course, if you are not going to create your own repair company.
Universal option
The easiest way is to make a warm floor with your own hands, using special polystyrene as a gasket. It combines the properties of a heat insulator and protection, easy to install. He has a profiled surface - in the form of grooves or protrusions. The pipe simply fits into the grooves. Such a material gives a very good waterproofing.
to contents ↑Important! If the location of the grooves is not very suitable for you, you can make them yourself, for which you need, however, a special cutter.
Preparing concrete
After you have laid and connected the pipes, you can pour concrete over the entire structure.
Important! They should first be filled with water - the pressure is 4 bar, and wait about two days or even a little more. This is necessary so that a possible leak appears immediately and it can be easily eliminated. In some cases, air is pumped into the pipes under pressure - for example, when the system is not yet connected to the heating system. Remember to connect a pressure gauge to monitor the pressure during priming.
The further procedure will be as follows:
- Fasten damper tape along all walls.
- Calculate the thermal expansion of the concrete pad - at a temperature of 40 ° C it is 0.5 mm per meter.
- Multiply the expansion parameter by the length of the largest floor area.
- Compare the result with the width of the tape.
- If necessary, lay another layer of tape next to the first
- If the wall length is more than 8 m, make a compensatory seam - this is also necessary if the walls differ in width by 2 times or more, as well as in rooms with complex geometry.
- On the heat seams, lay a plastic corrugation or a pipe of a larger diameter.
- Determine the entry of the pipe into the concrete cushion - it should not be less than 50 cm on each side.
Important! Pipes must not intersect with expansion joints.
Make a solution
Concrete for pouring can, of course, be ordered with home delivery. But nothing prevents making it right on the spot. You need:
- cement M300 or M400;
- sand;
- crushed stone.
Sand should be washed, and gravel should be with a fine fraction, from 5 to 20 mm. Mix the components in the following ratio: 1 part concrete, 1.9 parts sand, 3.7 parts crushed stone. You will get heavy concrete. Not everyone likes this option, because this material has low thermal conductivity. Much more often, a cement-granite mixture is used. It is done like this:
- Take 2 parts of crushed granite.
- Add 1 part cement.
- Add 4 more parts of fine granite screenings.
- Add water at the rate of 7 liters per 1 bucket of cement.
The advantage of the cement-granite mixture is that it conducts heat very well, moreover, it does not collapse when heated. You can add reinforcing fiber to the composition. And you definitely need to add a plasticizer designed specifically for underfloor heating.
to contents ↑Important! The height of the screed is 5-10 cm, the layer above the pipes should not be less than 3 cm.
When to test?
When laying a warm floor, it is important to wait until it dries completely:
- The screed will begin to set in four hours - of course, if you have correctly selected the brand of cement and prepared the concrete well.
- In twelve - you can walk on the floor, but not too often.
- However, before the moment when all other operations can be carried out, about a month should pass. And all this month you will need to maintain humidity and pressure in the pipes.
After the concrete has finally hardened, a thermal test should be carried out.
to contents ↑Important! Do not forget that it is necessary to heat the coolant gradually - with sharp heating, the screed can burst, even if made very high quality.
Completion of work
After the pipes are laid and the screed is made, and the entire structure has successfully passed the heat tests, you can proceed to the finish. This is done in the same way as in all other cases, that is, the surface is leveled, marked, and then the tile is glued. But there is one caveat - you need to choose a special glue, the packaging should indicate that it is intended for warm floors.
In the process, it may turn out that some tiles you have to lay on expansion joints:
- Glue one part of the tile with the glue you use.
- The second is to fix it with silicone glue, which compensates for the displacement of the base.
If you try to reduce the process of laying a warm floor to a simple scheme, then it will look like this:
- Remove the old cover.
- Remove all layers down to the subfloor.
- Strip the surface.
- Make waterproofing.
- Make a layer of thermal insulation.
- Lay a protective foil layer.
- Install the fasteners.
- Lay the pipe on them according to the selected pattern.
- Apply damping tape and reinforcing mesh.
- Perform a concrete screed, taking into account the technological features.
- Spread the topcoat.
Stock footage
This is not to say that laying a warm floor is the easiest type of repair work. But if you wish, you can do it yourself, especially since in the assortment of construction stores you will find absolutely all the materials you need - just understand what you need and what is right for your purpose.
- How to choose a vacuum cleaner taking into account the characteristics of the house and coatings?
- What to look for when choosing a water delivery
- How to quickly create comfort at home - tips for housewives
- How to choose the perfect TV - useful tips
- What to look for when choosing blinds
- What should be running shoes?
- What useful things can you buy in a hardware store
- Iphone 11 pro max review
- Than iPhone is better than Android smartphones
 (No ratings yet)