

DIY gypsum board kitchen set
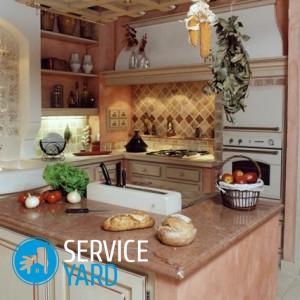
Drywall is a versatile building material that is made from building board and gypsum. The drywall sheet has a three-layer structure: the two outer layers are made of building cardboard and act as a frame for the filler, and the middle is made of gypsum. The materials are connected and constitute a single sheet, which is difficult to damage during installation and transportation. This article will interest those residents who are not ready to spend money on buying a new kitchen set. We will talk about how to make a kitchen set of drywall with your own hands. Having spent quite a bit of time on the information in our article, you will be able to realize even the most daring ideas.
to contents ↑Types of kitchen furniture made of drywall
Drywall is a common material that is used for walls, ceilings in the interior of office and residential premises. Surely many noticed that after cosmetic or major repairs there are many scraps of this material.
Of course, to make a full-fledged kitchen set from drywall will be difficult. But, at the same time, from the remnants of such material you can make individual pieces of furniture and elements of the kitchen interior, which will serve you well for more than one year:
- The easiest option for temporary kitchen furniture is a separate shelf or rack for dishes. They can be quickly assembled from scraps of a rack-mounted or guide metal profile and pieces of 12.5 mm thickness that are suitable in size.
- If you do not have a dining table when moving into new housing, then you can assemble it yourself:
- The supporting frame for the countertop can be made from the rack profile CD 50 per 100 mm.
- For legs, you can take the same profile. For reliability, each of the legs should be made of two profiles, fixing them together in the form of a closed box.
- After the frame is ready, on top it is necessary to fix the countertop from two drywall sheets, and to sew the supporting frame from the sides with a decorative base made of single gyroc.
- Under the windowsills, you can equip an isothermal niche with insulated doors. In the cold season, the temperature of the outer wall under the window is about 8 degrees lower than the temperature in the room. Therefore, with proper thermal insulation, such a niche can be used as an impromptu refrigerator.
- A light patterned plasterboard partition can visually separate the dining area from the area where food is being prepared. In addition to decorative purposes, such a partition can be used as a stand for indoor plants or a niche for storing dishes.
- In addition, from this material you can make all kinds of closed and open racks, cupboards for dishes, stationary cabinets, mezzanines, niches for household appliances, as well as built-in systems for storing various kitchen utensils.
to contents ↑Important! For the manufacture of any kitchen furniture from drywall, it is advisable to use a moisture-resistant drywall.
Advantages and disadvantages
Some are sure that a material such as drywall is not designed to make kitchen furniture out of it. In principle, this is so. But, at the same time, several arguments can be made in his favor:
- The cost of drywall sheets and their components is lower than the price of LMDF and chipboard. A solid board made of solid wood will cost even more.
- Cutting sheets of drywall can be done without powerful and expensive equipment. High-quality cutting and processing of the edges of chipboard at home will be difficult to perform.
- Massive pieces of furniture made of chipboard are heavy. Drywall solutions have a hollow design, so the result is quite lightweight.
- If you made a mistake or ruined some part during operation, it can always be replaced or corrected with acrylic putty.
- It may happen that some part of the purchased kitchen unit does not fall into place or does not fit. In this case, you can independently make a cabinet or kitchen cabinet, of any size and shape.
- If after some time you get tired of the appearance of the kitchen furniture, you can always remake or repaint it in any other color.
to contents ↑Important! The main disadvantage is that all gypsum board products have a stationary structure, are rigidly fixed to the load-bearing wall during installation. Therefore, before embarking on the manufacture of furniture from this material, you need to carefully consider what, where and how it will be located in the kitchen.
Preparation of materials and tools
To make a kitchen set of drywall with your own hands, you will need a tool kit, which includes the following:
- If the walls of your house are made of reinforced concrete, then for the formation of holes you need an electric hammer drill, as well as a set of drills for it with a diameter of 6-12 mm. To drill holes in the walls of brick, you can use an impact drill with a set of drills with a victory tip.
- For curly or direct cutting of drywall, you will need a sharp construction knife, a hand saw or an electric jigsaw with a set of saws for metal.
- It is best to trim the cut lines at the edge of the sheets with a small joiner planer.
- Metal profiles are best cut into size using a grinder, but if it is not, then you can use metal scissors.
- To tighten the screws, you will need a cordless screwdriver with a PH2 nozzle, one flat and one Phillips screwdriver.
- Of hand tools, pliers, an average hammer, a tape measure, a building level, a metal ruler and a rope plumb will be required.
- For finishing, you will need acrylic putty, interior paint, a narrow and wide metal spatula, fiberglass tape “serpyanka”, several paint brushes of different widths and a set of sandpaper with grit P60-P150.
- Of the materials you will have to stock up with moisture-resistant drywall with a thickness of 12.5 mm.
- A set of metal guides, as well as rack-mount wall profiles of the brand “UD” and “CD”. For small products, you can use the ceiling profile and guides.
- To carry out work with the profile, you will need accessories, as well as connecting elements, remote brackets, crabs, corner connectors).
- For the manufacture of shelves and doors, you will need ready-made furniture facades from LMDF or LDSP, door handles, hidden door hinges, magnetic latches and other furniture fittings.
- In addition, you will have to choose three sets of fasteners: self-tapping screws with dowels for concrete with a diameter of 8-10 mm, a set of galvanized self-tapping screws LB11 and a set of phosphated self-tapping screws 3.5 by 19 mm.
to contents ↑Important! To distinguish between conventional drywall and moisture-proof, there is one simple rule. The outer layer of the moisture-resistant sheet has a light green or green tint, and the inscriptions of the factory marking must be applied in red or blue.
Furniture assembly
The process of making a kitchen with your own hands from drywall is approximately as follows.
Stage 1: assemble the supporting frame
For the construction of any structure from drywall at the very beginning, a supporting frame is installed. It is assembled from galvanized metal profiles. For the construction of the frame, two types of profiles are required:
- Guides that are installed around the entire perimeter of the structure and are fixed to the ceiling, floor and side walls of the kitchen.
- Rack or main PS profiles on each side have one additional rib, so they are more rigid. From the main profile all vertical and horizontal load-bearing elements are made, as well as transverse jumpers of the metal frame and reinforcing struts.
Before you start creating furniture from drywall, you need to make a drawing. It should have a general view of the structure, views from the sides and from above, in addition, all sizes should be applied. Only after this can the assembly of the supporting frame begin:
- Mark the selected corner of the kitchen according to the drawing. To do this, draw on one adjacent vertical line along two adjacent walls, which will indicate the lateral dimensions of the future cabinet.
- On the floor, also draw marking lines that will correspond to the cabinet farm in the plan. If you are going to install it on the entire height of the kitchen, then put the same markings on the ceiling.
- Cut the guide profile into the segments of the required size, fix to the floor along the inner contour from the drawn line.
Important! If the cabinet will reach the ceiling, then fix the same profile to the ceiling.
- Fix vertical guides to one and another wall from the floor itself, on the inside of each of the vertical marking lines.
Important! If the cabinet will not reach the ceiling itself, then the length of the vertical rails should be equal to its height.
- If the cabinet in the plan has a square or rectangular shape, then in the front corner, install a vertical rack profile, which is fixed to the lower and upper guide.
- In the place where the doors should be located, install on both sides one rack-mount vertical profile. They will limit the opening, and swing doors will then be attached to them.
Important! If the cabinet does not reach the ceiling in height, then install a horizontal trim in its upper part, which will connect all the rails and vertical rack profiles to each other.
- Tie all vertical profiles firmly together using transverse horizontal jumpers. Arrange them evenly over the entire height, at a distance of 40-60 cm from each other.
- In those places where the doors are separated vertically, in the doorway, install one horizontal jumper from the main ceiling and wall profile.
- The ceilings in the cabinet can be of two options: stationary (from drywall) and removable (from laminated plywood or chipboard).
Important! In some cases, instead of metal profiles, a wooden beam of suitable section can be used to create a supporting frame. However, in doing so, it is worth remembering that over time the wood dries up and warps, which can lead to a change in the size and deformation of the frame.
Stage 2: Drywall
After the supporting frame is assembled and fixed to the walls, when creating a kitchen with your own hands from drywall, you must once again check all the dimensions according to the drawing, and also check the level of the vertical and horizontal arrangement of all profiles. Farther:
- Start the casing from the inside of the cabinet. If you plan to install removable shelves, then sew the entire interior with solid sheets.
Important! In a design with stationary shelves, sew each section separately.
- After the entire inner part is completely sewn up, proceed to the outer skin. For the outer sides, use solid sheets of drywall to create extra joints along the length.
- If you want to equip an isothermal box for vegetables in the cabinet, then between the outer and inner layers of drywall, lay a heater made of mineral wool or sheet foam.
Important! To prevent condensation from forming in the isothermal box, place a vapor-permeable waterproofing membrane under the heater.
- After cutting drywall sheets, trim the edges of the panels with a small planer.
- Fasten each panel to the supporting frame along the entire perimeter, and then screw a few screws into each of the transverse jumpers.
Important! All external corner joints of drywall must be strengthened with a protective cover profile PU, which is a perforated metal corner.
Stage 3: finishing decorative finishes
Immediately after the cladding is completed, the appearance of the cabinet will certainly not seem very attractive. Therefore, in order to ensure that the design does not stand out from the general style, perform a decorative finish:
- Carefully inspect all joints of the sheets, if necessary - cut off the protruding parts of the material with a sharp knife.
- Fill the V-shaped chamfer at the joints of the side and front panels with acrylic putty, and then glue along the entire length with fiberglass tape “serpyanka”.
- On the inside and outside, treat the entire drywall surface with a water-based adhesive primer at least twice. First coat all self-tapping screws, cracks and joints on the surface, after hardening, sand it with a medium-sized sandpaper. And with a second layer, hide all the surface irregularities.
- After the finish layer has hardened, finish grinding the surface. If the surface quality is satisfactory, then remove all fine dust with a damp cloth, and then re-treat the entire structure with an adhesive primer.
- After the primer has dried, proceed to the fine decorative finish. To do this, you can use interior acrylic paints, vinyl film or washable wallpaper.
Stage 4: install the doors
Ready-made furniture facades can be used as doors for a closed cabinet in the manufacture of do-it-yourself gypsum plasterboard kitchens. So that the finished doors do not get dirty or damaged during the finish, they must be installed at the very end. The doors in the kitchen cabinet can be of two types:
- Hinged - have a simpler design, will be much cheaper. At the same time, to open such a door in front of the cabinet, you must have free space.
- Sliding - accessories for such doors are more expensive, but they will be more convenient to use, will make it possible to save free space in the kitchen.
When installing swing doors, some rules should be considered:
- To prevent the door from warping and closing tightly, its size on each side should be 2 mm smaller than the internal size of the doorway.
- Preinstall the finished door in place, and then fasten it to the door hinges. They should be located at a distance of 8-12 cm from the lower and upper edges.
- Fix the mating parts of the hinges to the vertical profile of the doorway at the same distance from the bottom and top.
- After that, attach the door with hinges to the vertical profile of the doorway using two adjustment screws.
- Install a handle on each door and attach a magnetic latch inside the cabinet.
A set for installing sliding doors can be bought at any hardware store. Different models may differ from each other, but in general, their installation occurs approximately like this:
- The height of the sliding doors should equal the height of the doorway.
- The width of each of the sliding doors should be 10-15 mm greater than half the width of the doorway.
- In the upper and lower parts of the doorway, install the upper and lower guide, respectively.
- Fasten the roller movable mechanism to the upper and lower end of each door.Loosen the upper fastener, and then secure each door on both sides between the lower and upper rails.
- After both doors are in the correct position and adjusted, press the upper roller mechanism firmly in the upper guide and finally tighten the fixing screws.
to contents ↑Important! When designing an isothermal box in the cabinet, it is recommended to install swing doors, not sliding.
Stock footage
Thus, after reading the material of our article, you can make sure that a do-it-yourself kitchen from drywall is much cheaper and easier than a purchased kitchen set. We described the manufacture of one cabinet, but by the same principle you can design the rest of the furniture.
- How to choose a vacuum cleaner taking into account the characteristics of the house and coatings?
- What to look for when choosing a water delivery
- How to quickly create comfort at home - tips for housewives
- How to choose the perfect TV - useful tips
- What to look for when choosing blinds
- What should be running shoes?
- What useful things can you buy in a hardware store
- Iphone 11 pro max review
- Than iPhone is better than Android smartphones
 (No ratings yet)