

Attic staircase in a small house
If you have an attic in your house, you can turn it into a pretty cozy and functional room, designed both for relaxation and for work. Such a room will save you from the need to build additional buildings or floors. The primary and main stage in the arrangement of the attic is the assembly and installation of the stairs. Unfortunately, ready-made options may not suit you, since such designs do not always fit into the dimensions of the room, and an individual order is a very expensive pleasure. Therefore, many people think about making this design with their own hands. If you also decided to make a staircase to the attic in a small house yourself, our experts will help you with this and tell you all the subtleties and nuances that will come in handy during work.
to contents ↑Attic stairs classification
Making a staircase to the attic in a small house with your own hands, you should proceed from the safety rules, as well as the square of the room where this structure will be installed.
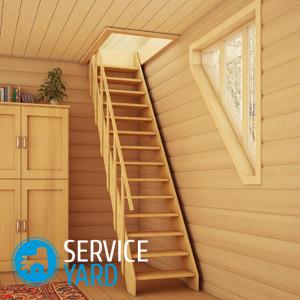
Important! Pay attention to the fact that bulky structures that are not suitable for the attic are considered the most safe stairs. And in order to reduce it, the ladder will need to be made too steep. Therefore, the most optimal option for the attic is a folding model of a structure made of wood or metal.
To date, the following types of attic stairs are considered the most popular:
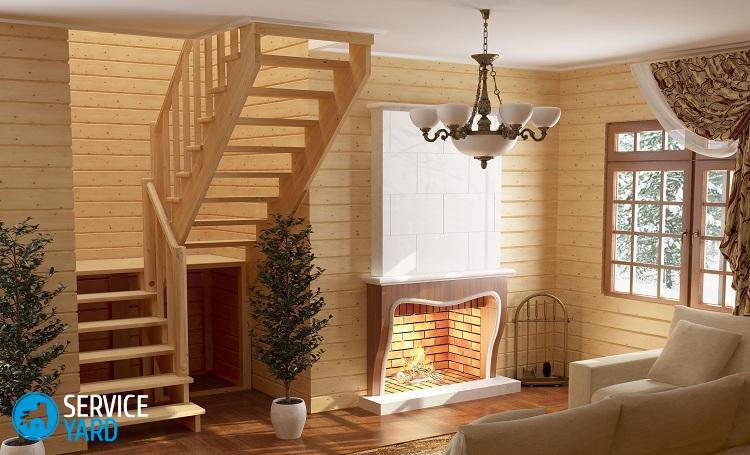
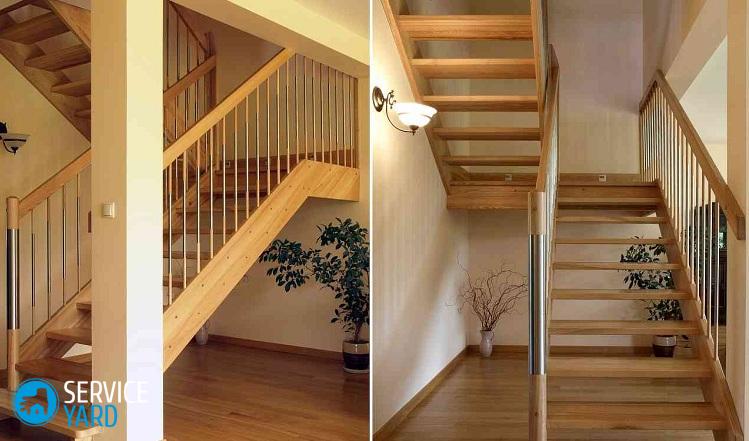
- Marching. At the heart of this design use bowstrings, squats and braids. To save space, the flight of stairs is performed with two marches, between which there is a platform or runway. The single-flight version is more bulky, but if desired, the space under it can be used for your own purposes. For example, put bookshelves or equip a pantry.
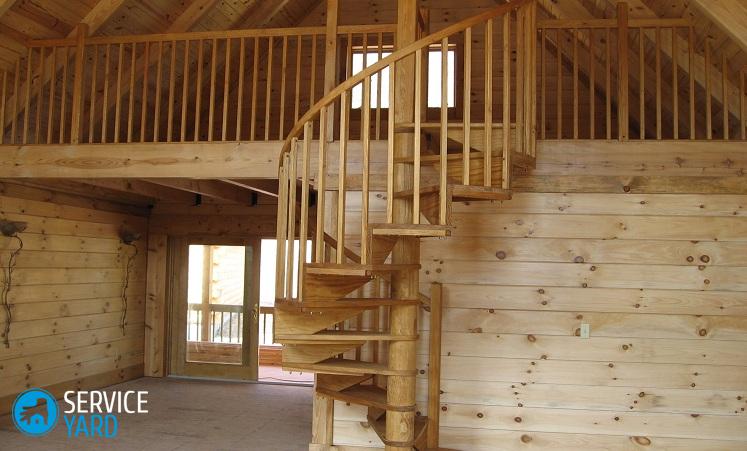
- Screw. This is a universal option that does not take up much space, but at the same time, due to its structure, it fits perfectly into absolutely any interior.
Important! It is quite difficult to make a spiral staircase yourself. Therefore, it is better for you to initially make all its components under the order, and already assemble and install it yourself.
- “Duck step.” This design is somewhat similar to the marching according to external data. The difference is a more comfortable lift and overall dimensions, as well as a canvas located at an angle of 45 degrees.
The main components of the staircase
Independent manufacture of an attic staircase, regardless of the design you have chosen, requires many parts.
Kosoura
In order to make the climb comfortable, you should take care of the braces in advance - wooden supports. Such supports hold the steps, respectively - they must be sawn in the form of teeth. The thickness of such boards should be at least 5 centimeters, and the length - 25.
Important! In the manufacture of the simplest stairs, you will need only two braces. If it is wider than standard parameters in width, you will need one more additional beam.
In order to correctly make kosour, it is necessary to make special measurements.This is done by pulling the rope from the attic floor to the location of the future staircase structure.
Tread
This is the horizontal part of the step that is stepped on directly while walking. To make it, you will need boards 25-55 millimeters wide.
Important! Pay attention to the fact that treads should be overhanging over the proper step in the amount of 20-40 centimeters.
Risers
The vertical part of the step, which is located between the treads. Such an element of the staircase construction does not carry any load at all, therefore, they can be omitted to visually lighten the stairs.
to contents ↑We choose the material for the attic stairs
The most commonly used option in the manufacture of stair structures on kosoura is coniferous wood - larch and cedar. Also, a spruce will do for these purposes, but difficulties arise due to knots during operation.
In addition, for the manufacture of attic stairs, other materials can also be used:
- Oak;
- Ash;
- Beech.
Important! Try to choose dry wood that will have a smooth surface without knots. This is necessary so that the finished structure does not have weak points.
Also, during work, you will also need special tools, such as:
- Jigsaw;
- Wood hacksaw;
- Circular Saw;
- Metal corner;
- Building level;
- Drill;
- Pencil;
- Sander;
- Brushes for painting;
- Joiner's glue.
After you have designed the design of the stairs to the attic, and also prepared all the necessary tools and materials, you can proceed directly to its manufacture.
to contents ↑How to make a staircase to the attic yourself?
Before assembling and installing this design, it is very important to first study its features and make the correct calculation, since not only the aesthetic appearance depends on it, but also the safety of yours and your loved ones.
Basic installation rules
The main point in the manufacture of staircases is the correct determination of the angle of inclination:
- If it is less than 20 degrees, then this design will be similar to a ramp.
- If over 50 degrees, you simply can’t walk on it.
- Therefore, the best option is an angle of inclination of 30-38 degrees.
Important! For attic staircases, an inclination angle of 45 degrees is allowed.
As for the sizes of steps and risers, they are determined directly from the dimensions and the angle of inclination of the finished structure. That is, the smaller the angle of inclination, the tread will be deeper, and the riser less.
Important! Pay attention to the fact that if you add the dimensions of the tread and the riser, in the end they should be equal to 50. In some cases, this parameter can be reduced to 45.
For a more accurate and correct calculation, there are special formulas and diagrams. Unfortunately, they are mainly used in typical design. As for the independent manufacture of the staircase structure, it is quite difficult to withstand such parameters, especially for a beginner. Therefore, most often, the following indicators are taken as the basis:
- The riser height should be equal to 16 centimeters, if the angle of inclination of the structure is 33-37 degrees;
- 18 centimeters with an inclination angle of 38-42 degrees;
- 20 centimeters, at an angle of inclination of 45 degrees.
Important! The optimal width of the stairwell is considered 80 centimeters. If you have more than 2 people living in your house, this parameter should be increased to 1 meter.
Choose the installation location
After you have become familiar with all the requirements, you can proceed directly to the choice of the future location of the finished structure.
The most optimal option for placing the stairs is directly at the entrance to the attic. It’s best to have a separate room.Thus, you can erect a staircase of the desired size, while ensuring proper thermal insulation.
Important! In the absence of a vestibule, the staircase can be installed near the far wall. Thus, the finished design will not bother you when walking, while taking up very little free space.
Hatch creation
Before you make a staircase to the attic with your own hands, you must first prepare the inlet - the hatch. The sequence of actions is as follows:
- Make the necessary markings on the floor of the attic. Try not to get on the load-bearing beams.
- According to the finished sketch, make a few holes in the ceiling. Thus, you outline the future contour of the entrance to the attic.
- With a pencil, draw the exact location of the future hatch.
- Using a circular saw, saw through the ceiling.
Important! Propyl should be done very carefully so as not to injure your hands. It is advisable to wear special tight gloves.
- Remove the layer of thermal insulation material, as well as any unnecessary parts of the ceiling. You should get a smooth through hole in the ceiling, which will be the entrance to the attic.
Important! Please note that all necessary calculations should be made after cutting the hatch. This is due to the fact that the location and features of the bearing beams can significantly affect the future installation location and dimensions of the staircase structure.
Marking and cutting kosour
The kosour manufacturing process consists of the following steps:
- Measure the angle of inclination at which the steps will be mounted on the kosour.
- Apply the marking you need to the support beam. Cut out the grooves.
- Shorten the kosour board so that it is equal to the previously pulled rope.
- Cut to the desired slope.
Important! When shortening, the beam should not be on the floor, but on the support cut into the floor.
- Insert the finished braid into the upper mounting element.
- Mark the remaining beams in the same way.
Important! In order for the finished design to turn out smooth and not be skewed, making the second and third oblique, the parameters of the first should be strictly observed.
Assembly of the finished staircase
The assembly of the stairs to the attic must be carried out strictly observing the following sequence of actions:
- Install the base for the finished structure. Using a drill and kosour, screw the screws to the previously installed bar. The spikes must be inserted into the prepared holes, which must first be greased with carpentry glue.
- Using metal corners and plates, fix the structure.
- Fix the board adjacent to the wall.
- Mount the feet. This should be done from the bottom up. Pre-weld the joints with glue, then fix with screws.
Important! If stairs are supposed to have risers, they should be installed at the same stage. They also need to be screwed with screws, starting from the first step.
- Set the railing. First put the extreme pole, fix it with screws near one of the first steps. Install balusters in the same way. Now, over the balusters you can put a railing.
Important! Installation of balusters of 2 pieces per step is allowed.
- Decorate the surface of the finished structure by opening it with varnish.
Stock footage
Independent manufacture of a staircase to the attic is not an easy process, but at the same time it is not difficult, especially if you understand all the nuances and subtleties. We hope that our advice will help you to make and install a solid and reliable staircase construction, which will be not only a functional element, but also a very bright accent of the room, as well as your personal pride.
- How to choose a vacuum cleaner taking into account the characteristics of the house and coatings?
- What to look for when choosing a water delivery
- How to quickly create comfort at home - tips for housewives
- How to choose the perfect TV - useful tips
- What to look for when choosing blinds
- What should be running shoes?
- What useful things can you buy in a hardware store
- Iphone 11 pro max review
- Than iPhone is better than Android smartphones
 (No ratings yet)