

Installation of underfloor heating under tile
- Advantages of installing a warm floor under the tiles with your own hands:
- Options for electric underfloor heating for tiles
- Creating a floor heating project
- Thermal insulation of the surface for the installation of underfloor heating under the tile
- Surface preparation for installing a warm floor:
- Installation of a temperature regulator and temperature sensor:
- Do-it-yourself installation of a warm floor under a tile
- Laying tiles on a warm electric floor:
- Stock footage
Installing a warm floor under the tile has become not a luxury, but rather a necessity. The most common installation of electric underfloor heating under the tile. And this solution is correct and reasonable, because the electric floor is perfectly combined with many finishing materials, such as ceramic tiles, natural stone, porcelain tiles and others. In our article we will tell you how to perform all these works and avoid difficulties in the installation process.
to contents ↑Advantages of installing a warm floor under the tiles with your own hands:
- The floor surface and space heating can be done at any time of the year, regardless of the start of the heating season. This issue is especially relevant for multi-storey buildings with a central heating system.
- Installing a heated floor under a tile with an electric heating system eliminates leaks, as is the case with a water heated floor.
- The floor is not cooled in the event of a power outage or interruptions in its supply, as happens with an installed water floor.
- Simple and accurate sequence of adjusting the temperature of floor heating.
- It occupies a minimum amount of space and room height due to the thin diameter of the heating cable. For installation, a screed of small thickness is required.
- The same power for heating around the perimeter of the room.
- Simple service system.
Options for electric underfloor heating for tiles
If you decide to make a warm floor in your house, then first of all you need to choose which system to install. Next, we consider what are underfloor heating, their features, advantages and disadvantages.
Cable
The heating resistive cable for installing the underfloor heating is implemented in a coil or bay. Mounted on the surface by fixing on a special bracket. In construction stores, you can purchase a minimum or a complete set of parts.
The cost of the heating system depends on the power of the cable, its length, and configuration.
Important! To save the budget for the installation of heating, you can independently assemble the elements necessary for the work.
In the process of choosing a cable, pay attention to the fact that the heating cable can be one or two-core.
Important! The option using a two-core cable is more reliable, the single-core option is more budget.
Using a cable system for tiles is not very popular with owners of houses and apartments. This is due to the need for mandatory filling of the screed on the surface, which has its drawbacks:
- The load on the main plate increases, which is not very good, especially in multi-story buildings.
- The height of the ceilings in the room decreases, which significantly affects the appearance of the room.
- Floor screed involves wet work and a long drying period, which is not always very convenient in residential apartments for users.
- Calculating the cable length is more difficult than calculating the required length of the heating mat.
Heating mats
In most cases, the installation of an electric heated floor with their own hands under the tile is performed in this particular version. Installation of the system is quite simple and does not require the help of a qualified specialist.
The cost of the system is an order of magnitude more expensive than the previous version, however, the calculation and sequence of installation are less time-consuming.
Film (infrared)
Doing underfloor heating in the bathroom under the tiles using film heating will cost you a tidy sum. In simple terms, the cost of the system is the highest, but its reliability is unrivaled. This is due to the fact that there are no electromagnetic waves in it.
to contents ↑Important! If we conduct a small analysis of consumer reviews and recommendations of masters professionally performing such work, we can conclude that cable heating in the mats is more suitable for the installation of a warm floor system.
Creating a floor heating project
The technology for installing a warm floor under a tile, laminate, parquet or other type of flooring has its own characteristics that must be considered before buying materials. To reduce the cost of material or the purchase of unnecessary elements, it is very important to first draft your underfloor heating. Carrying out all the calculations, consider the following nuances:
- If you plan to lay the cable, consider the location of the overall furniture, for example, a sofa, a refrigerator, a washing machine, since the wire can not be laid under them.
Important! The cable passing under the dimensional furniture creates an additional load on the entire heating system. In this case, warm air does not pass along the entire perimeter of the installation, and when it reaches the barrier, it returns.
- It is necessary to start spreading the wiring or the heating mat at a distance of 15-20 mm from the walls.
- Parallel turns in the room are located at a distance of at least 10 cm from each other.
Important! For the normal circulation of heat in the room, purchase furniture, cabinets, leg beds.
- In the process of creating the project, determine the location of the heat regulator, according to the rules it is mounted at a distance of 90cm-1m from the floor.
to contents ↑Important! This height is considered optimal for use, and also does not require ditching a large section of the wall to connect the regulator and the cable to the underfloor heating.
Thermal insulation of the surface for the installation of underfloor heating under the tile
This type of work is carried out before preparing the base for underfloor heating or after it. The sequence of thermal insulation depends on what type of thermal insulation material you purchased, as well as on the condition of the plates in the room:
- It is necessary to purchase thick thermal insulation material if the room is located above the basement or unheated room, on the balcony.
- To insulate such areas, foam or polystyrene foam is used.
- It is necessary to lay thick sheets of thermal insulation before the floor surface is leveled.
Important! Layer thickness varies from 20 to 100 mm.
- Thin insulation sheets are used on an already smooth, prepared surface. In this case, the usual foil penofol is suitable, it is laid with its reflecting side up. This position sends heat inside the room.
- The thicker the material used to warm the room, the more you need to indent from the wall. For example, for expanded polystyrene - 1 cm, for thin penofol - 0.5 cm.
- To fix the building material on the wall, a damper tape is used. It is used to prevent the expansion of the material under the influence of heat.
Surface preparation for installing a warm floor:
- Regardless of which type of underfloor heating system you purchased, whether it be a heating cable or a heating mat, the installation of underfloor heating under ceramic tiles is carried out exclusively on a flat surface, from which residual debris and dust are previously removed.
- If the floor of the room is uneven or has projections and cracks, they should be repaired.To do this, fill the perimeter with a screed, putty cracks and finally finish with a primer.
Important! If a concrete screed is used to level the floors in the room, all subsequent work is carried out only after it has completely dried. To speed up the process, you can align the perimeter of the room with the help of bulk floors.
- Installation of a warm floor on a wooden floor or plywood is not recommended.
- Wall chipping for the installation of a thermostat is carried out at this stage of work.
to contents ↑Important! If the installation of underfloor heating under tiles is done in a repaired room, the wire can be laid in plastic boxes that are placed outside.
Installation of a temperature regulator and temperature sensor:
- The heat controller is located in a pre-selected convenient place for it.
- The wiring that connects the regulator and the heating cable is mounted in the corrugation, and it is placed in the pipe and held to the location of the sensor.
- The temperature sensor is installed at a distance of 30-40 cm from the wall between the turns of the system and mounted in the corrugation. This makes it easy to repair the sensor in case of failure.
Important! This arrangement makes it possible to accurately measure the temperature of the system.
- The corrugation is laid out smoothly, avoiding creases and excesses. The edge resting against the heating system must be insulated with sealant.
to contents ↑Important! It is especially worthwhile to work in places located near the baseboard.
Do-it-yourself installation of a warm floor under a tile
In order for the room heating system to work properly, it is necessary to correctly position the cable or heating mat over the entire heated surface. The technology and workflow of these heating options is slightly different. Further we will consider each of them in more detail.
Installation of a cable of a heat-insulated floor under a tile:
- Before starting work, check the resistance of the cable and the heating power.
- On the floor, attach a special tape with fasteners. Since there are enough fasteners on the tape, you have the opportunity to arrange the cable in the right direction and distance from each other.
Important! As an option, you can use a metal mesh on which the cable is attached using plastic clamps.
- The heating wire is placed 15-20 cm from the wall and 10 cm from each other, moving around the perimeter of the room in the form of a snake.
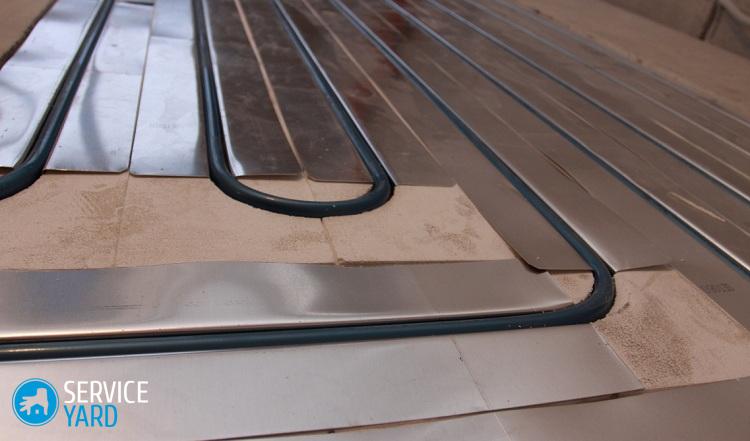
Installation of a heating mat for warm floors
This type of space heating system is much easier to install than cable installation:
- To fully connect the system, it is enough to spread the mat on the floor and check the resistance.
- The heating mat can be installed not only directly. If you trim the carrier grid, you can rotate it in the direction you need. In the same way, obstacles in the room are avoided, for example, dimensional furniture, a refrigerator or a washing machine.
- The mat must be positioned in exactly the same way as the heating cable, the distance between the sections is 0.5-1 cm.
- On the surface, so that the sheets do not move, they are fixed with tape.
Important! Regardless of which system of underfloor heating you decide to install in the room, the installation of a residual current device (RCD) is required.
Regarding the laying of a warm floor under the tiles with your own hands in such rooms as a sauna or bathhouse, there is no unequivocal opinion. Some masters argue that, subject to all the rules and installation standards, it is permissible to install a floor heating system in such rooms. However, the second half of specialists argues that the location of an electric heated floor in a sink or shower is strictly prohibited.
Important! As an option, it is possible to turn off the system at the time of using the shower room, but it should be remembered that the operation of the electrical system in a humid environment is extremely dangerous for human life and health.
Testing the underfloor heating sensor
Immediately before filling the floor with a screed under the tile, you need to check whether everything is working properly. For the test you need a multimeter or a special tester. Allowable discrepancy as a result should be no more than 10%.
to contents ↑Laying tiles on a warm electric floor:
- In the process of calculating the thickness of the screed, you need to proceed from the thickness of the cable of the warm floor.
Important! The more powerful and thicker the wiring, the thicker the screed layer will be.
- For cable heating, the screed is 3-5 cm.
- For heating with an electric mat up to 3 cm.
- The surface screed can be carried out with concrete mortar, but its use significantly reduces the height in the room and dries for a long time. Alternatively, you can use glue for tiles.
Important! There is a method of laying warm electric floors without screed. For this, the adhesive layer in the process of laying tiles should be 1.5-2 cm.
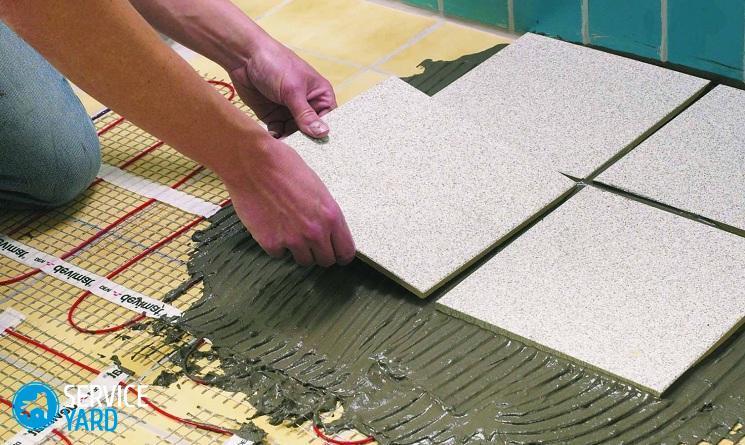
- The technology for laying tiles on a warm floor is exactly the same in sequence as on a conventional base.
Important! For work, purchase a special adhesive mixture designed for use on a warm surface. Mixtures are specifically labeled “underfloor heating” or indicate the temperature range for use.
- In the process of laying tiles, applying the solution to the heating mat, pay attention to the fact that there are no empty areas, in the future they can lead to overheating of the cable.
- The solution is applied to the surface with a special spatula. Work is carried out carefully and slowly so as not to damage the integrity of the system.
- You can stand on the floor and carry out finishing work by grouting not earlier than in one day.
- It is recommended to turn on the heating system only after the adhesive mixture has completely dried.
to contents ↑Important! If you connect the heating ahead of time, cracks may form on the surface under the influence of temperature.
Stock footage
This article has all the main answers to the question of how to properly put a warm floor under the tile. In such a case, it is necessary to follow the recommendations and the connection sequence, and most importantly, to purchase high-quality components for the work. Thus, you can definitely install a reliable tiled floor with heating, which will warm you and your loved ones in the cold season and make your home even more comfortable.
- How to choose a vacuum cleaner taking into account the characteristics of the house and coatings?
- What to look for when choosing a water delivery
- How to quickly create comfort at home - tips for housewives
- How to choose the perfect TV - useful tips
- What to look for when choosing blinds
- What should be running shoes?
- What useful things can you buy in a hardware store
- Iphone 11 pro max review
- Than iPhone is better than Android smartphones
 (No ratings yet)