

Do-it-yourself pipe laying in the bathroom
In the process of housing construction, redevelopment or major repairs, work related to utilities is always required. At the same time, the bathroom is the most loaded room in the house, since in the bathroom piping to several points of water distribution and installed equipment is always necessary. For pipe routing, you can invite a specialist, but you can carry out this operation yourself. Believe me, laying pipes in the bathroom with your own hands is not such a difficult thing. Whatever decision you make, the installation of pipes in the bathroom must be done correctly and efficiently, so that the system works without failure for many years. And for this, when working, it is necessary to be guided by the correct wiring diagram, take into account the recommendations and good advice of professionals. How to properly install pipes and sanitary ware in bathrooms will be discussed in our article.
to contents ↑Preparatory stage
Before you make the wiring of pipes in the bathroom, you need to make a plan in which the following points should be indicated:
- The choice of wiring diagrams. There are three main wiring diagrams:
- Collector.
- Sequential.
- System with bushing sockets.
- The arrangement of all plumbing and communications, summed up for each device. For example, a toilet bowl - cold water and sewage connection, a bathtub (shower) - cold and hot water supply and drainage, a washing machine - cold water and sewage connection, etc.
Important! The latter scheme is used only in private homes and requires the installation of an additional pump designed for water backwater. In addition, this wiring system involves laying a pipeline of a greater length than analogs, so it is used extremely rarely.
- Choosing a pipe installation method. DIY water distribution in the bathroom can be done in two ways:
- Open. This method involves the location of communication from the outside. In terms of simplicity, ease of maintenance and reliability, this installation method is preferable.
Important! The disadvantage of an open installation method is the formation of condensate in the cold season due to the large difference in the temperature of water and air.
- Closed. Flush mounting does not spoil the overall design of the room, since all communications are hidden from view. Pipes passing inside the walls must be protected by metal pencil cases or corrugated hoses.
Important! Hot pipes should be located above the cold ones, and all pipes should be additionally packed in a heat insulator. And although it takes a lot of effort and time to implement this method of pipe installation, modern repair involves hidden installation.
- Identify all points of water intake.
- Choose a method of connecting the sections to each other and take into account the place for cranes and emergency valves.
- Make a list of materials - pipes, fittings, valves, adapters, filters.
Important! Calculate the estimated material consumption with a margin.
Advice:
- If the plumbing rooms are divided, then the piping must be done in both parts of the bathroom at the same time.
- In apartments with centralized water supply, the central pipeline will act as the center of the system, from which branches extend to connect water distribution points. All systems pass next to each other and are connected to risers.
to contents ↑Important! If in the apartment an autonomous water heater acts as a source of hot water, then in the center of the hot water supply system will be the boiler.
Wiring diagrams: advantages and disadvantages
Installation of a pipeline with bushing outlets is practically not used, due to the high complexity and high consumption of material, so we dwell on the advantages and disadvantages of the other two installation methods.
Serial wiring
The essence of the sequential method: the installation of the pipeline is carried out in stages, and plumbing fixtures are connected in series. This is a simple and uncomplicated way to install pressure pipelines.
Advantages of a consistent tubing layout in a bathroom:
- Simplicity.
- Compactness.
- A small number of connections.
- Economical in the number of pipes and additional materials.
The disadvantage of the system:
- Suitable exclusively for rooms with a small number of consumers.
- It is realized mainly in an open way. A serial wiring diagram can be performed after finishing work in the room.
- Decrease in a water pressure at simultaneous inclusion of several water points. The lack of water pressure can lead to improper operation of the equipment.
- The need to completely shut off the water supply during the repair or maintenance of one plumbing fixture.
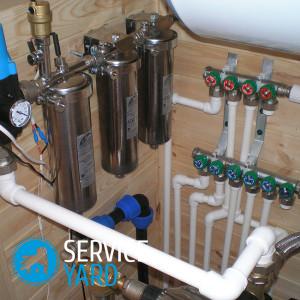
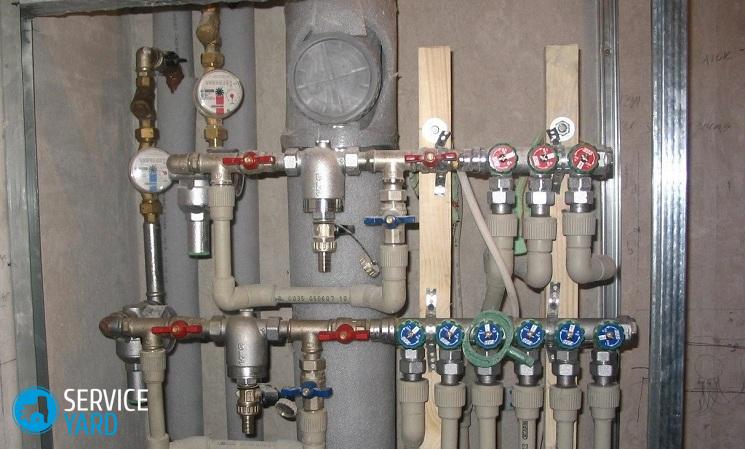
Collector
In this scheme, a separate section of the highway is provided for each water intake point. As a result, the water supply to the equipment can always be adjusted using taps or completely shut off if necessary.
Important! The supply pipes in the collector circuit have a minimum number of connections, which means that there is the possibility of a hidden installation. Regulating taps are placed on a small collector, most often they are cleaned in a special cabinet.
The advantages of this pipe routing scheme in the bathroom are obvious:
- The water pressure is distributed evenly, regardless of the number of simultaneously connected devices.
- The ability to service plumbing equipment in turn without disconnecting the bathroom from the water supply.
The disadvantages of the method:
- Increased consumption of materials for installation. For each connection to the collector, you will need to purchase and install additional shut-off valves.
- The cost of a collector connection is several times higher than the serial installation.
- It is difficult to do collector wiring independently. Typically, professionals design and carry out such wiring.
What pipes to choose for installation?
Do-it-yourself pipe installation in the bathroom also involves the choice of material. Experts recommend choosing practical and modern solutions.
Polypropylene
Installation of polypropylene pipes in the bathroom is carried out using diffusion welding. As a result, inseparable reliable joints are obtained.
Polypropylene pipes have a high resistance to alkaline and acidic environments, withstand pressure up to 25 atmospheres, are durable and not subject to corrosion. Suitable for both cold and hot water. The latter are protected by a layer of fiberglass or foil.
Important! Disadvantages of polypropylene pipes: low thermal conductivity (they do not hold the temperature for 90 degrees for a short time), it is difficult to replace them.
Metal plastic
Plastic pipes are used only for external installation. Each pipe is a two-layer structure consisting of an internal plastic part and an external metal part. Plastic pipes bend well, which reduces the number of joints, they are inexpensive.
Installation of plastic pipes in the bathroom is quite simple.To equip the joints, compression or clamping fittings are used.
Important! Design flaws: short service life (up to 10 years), it is necessary to check the attachment place every year and bring it with a key.
Copper
Copper pipes have high corrosion resistance, strength and durability (serve up to 60 years). Copper pipes are stable in the temperature range from -100 to +250 degrees.
Important! The only drawback is the high price and complexity of installation. Installation of such a pipeline requires special equipment and complex connections, which only professionals can do.
Stainless steel
Most often used for heated towel rails. Steel pipes are used extremely rarely, since they are expensive and DIY installation is quite complicated.
Cast iron
Cast iron pipes are used for risers and for laying external highways.
to contents ↑Making a diagram for DIY plumbing in the bathroom
The layout of the piping in the bathroom is necessary for quality installation of the entire system. It is best to execute such a plan on a scale on graph paper. In this case, all measurements will be reduced several times.
Put on the diagram:
- Dimensions of the room with the location of windows and doors.
- The entry point on which to install the valve.
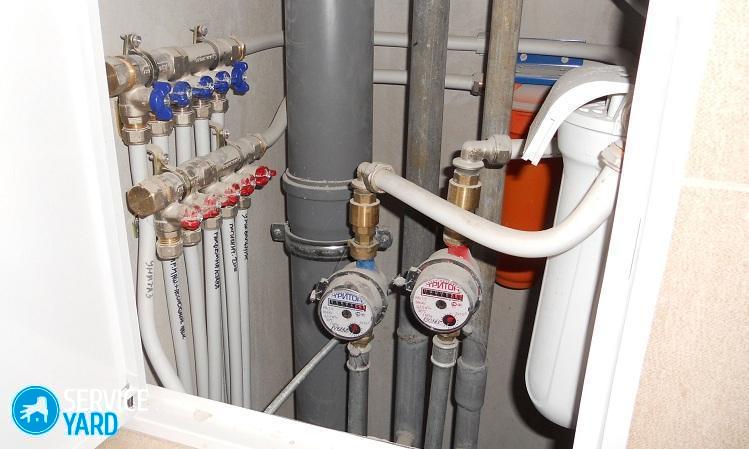
- The location of the water meter, check valves and coarse and fine filters.
- If necessary, do not forget to place the pressure reducer.
- Locations of faucets and appliances.
When drawing up a wiring drawing, adhere to the following rules:
- Pipes must not cross. If this does not succeed, then at least try to make the pipes intersect as little as possible.
- All plumbing equipment sections, valves and metering devices should be freely accessible.
- Sewer and water pipes should be as close as possible to each other. This is necessary for joint placement of them in boxes.
- The number of connections should be minimal.
Advice:
- Make the wiring diagram as simple as possible. Lay all the main pipes above the floor at the bottom, and from them install water outlets perpendicular upward through the tees. The exception is only the elements of the sewage system, which can be connected to the tees with flexible hoses.
- After all pipelines and sections of their connections are indicated on the drawing, count the length of the necessary elements and additional parts.
- Remember that the couplings and pipes must be homogeneous, that is, made of one material.
- If the house is connected to city communications, then the mains can be laid with a pipe with a diameter of ½ inch. However, if a instantaneous water heater is present in the hot water supply system, a more balanced approach to the choice of pipes is required.
- With a collector circuit, the diameter of the pipes does not matter, and with serial wiring, increase the diameter of the main pipeline to ¾ inch. This is due to a decrease in water pressure when connecting several points of water intake.
Installing pipes in the bathroom
Depending on the selected pipe material, you will need the following tools:
- Gas and adjustable wrenches.
- Scissors for cutting pipes.
- Tape measure and pencil.
- Stripping, soldering iron and nozzles for soldering polypropylene products.
- Fittings, tees, angles.
- Plumbing paste, fum tape or tow for sealing compounds.
Step-by-step instructions for installing pipes in the bathroom:
- Shut off the water supply.
- For covert cabling, prepare strobes and pipe niches.
- Measure and cut the necessary fragments of communication, adhering to the compiled project.
- Strip and chamfer the pipe with a knife. Degrease parts and place them in the soldering apparatus.
- When heating to 270 degrees, connect the pipe sections to each other.
- Install a check valve near the common riser.Thus, if necessary, it will always be possible to shut off the water supply to the apartment.
- Install a coarse filter just behind the valve. Mount the meter (if necessary) on the cold water pressure line.
- Extend the main line to the first consumer.
- Install the tee and route the vertical pipe. Attach a corner and a piece of pipe protruding 3-4 cm above the wall surface to the edge of the pipeline.
- Install the fitting to connect the consumer.
- Repeat the algorithm for all installed mixers and appliances.
- Route the piping in the same way to connect the equipment to the hot water system.
- After completing the installation of the pipeline, conduct a test run of the water to check the system for leaks and to identify the places of possible leaks.
- If the system is working properly, then proceed to decorate the walls. Close the box and niches with drywall. Level and plaster the walls. Above the wall surface, only fittings should be visible.
- Connect plumbing fixtures to flexible fittings.
Important! When piping using a manifold, connect it to a filter or meter. From each terminal, draw a separate branch to the points of distribution. The collector wiring diagram looks cumbersome, so it is better to perform it in a hidden way.
Advice:
- If desired, you can install an additional fine filter, which is mounted after the counter.
- To establish the optimal parameters for the functioning of the water supply system, mount the gearbox with a manometer (3-4 atm.). This is especially true if the water supply is mounted in a private house.
Drain system connection
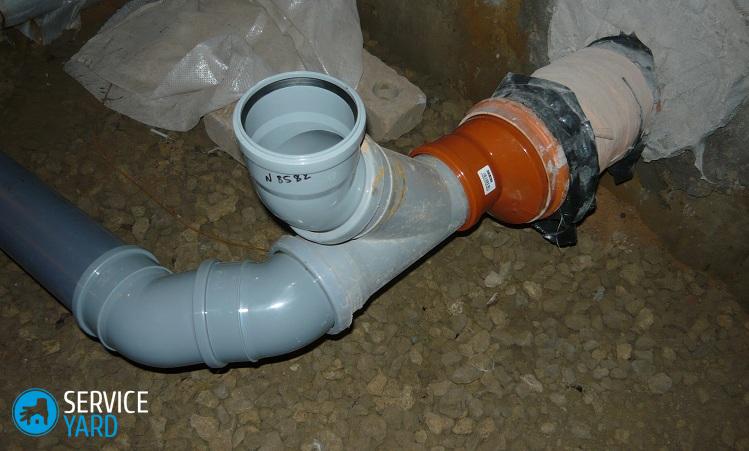
Recently, laying drain plastic pipes has gained wide popularity, since its installation is not particularly difficult. The system consists of straight sections and connecting elements having special rubber seal rings.
Sewer system assembly is simple and easy:
- Installation starts from the point farthest from the riser. Withdraw a pipe slope of about 2 cm per linear meter.
Important! With a large slope, the flow rate will be too high, with a small - low.
- Connect the elements using special sockets directed towards the riser. An o-ring must be inside the bell to prevent fluid from flowing. When mounting it, lubricate the inner surface of the socket with soap and silicone.
- Install the toilet, depending on the location of the sewer pipe. Before attaching the toilet to the sole, apply silicone to the joint surface.
- Secure the plumbing with bolts and plastic washers. After the silicone has dried, install the drain tank and fasten it with bolts. Route the flexible hose to the tank.
- Close the tank and check the operation of the sewer system.
Advice:
- If the plumbing equipment is at a fairly large distance from the drain, then install an additional tee with a cap on the top hole. Subsequently, through this hole it will be possible to clean the sewer.
- Connect the sewer pipes to each other so that a smaller diameter of the part is inserted into the pipe of a larger diameter, and not vice versa.
- Try to make the layout of sewer pipes as simple as possible, and to connect all plumbing in series so that there are no “crossroads", otherwise - a congestion will occur when the water from two devices is drained simultaneously.
How to make plumbing in the bathroom with your own hands?
If the area of the bathroom allows, then the procedure for installing plumbing fixtures is not important. If the bathroom is not so spacious, then you should start the installation with large-sized devices - a bathtub, shower. Before proceeding to the wiring of pipes in the bathroom, a number of preparatory work should be performed:
- Remove the old plumbing.
- Prepare the surface of the walls and floor. If necessary - remove the tile from the surfaces. After the walls are freed from the cladding, they should be cleaned.
- If you plan a suspended ceiling, then build a frame.
- After the preparatory work, mark and pipe the pipes in the bathroom in accordance with the previously drawn up plan.
After installing the pipeline, you should proceed to the finishing and installation of plumbing.
Bath
In order for the bathtub to stand firmly and reliably, carefully read the instructions for the device and follow the manufacturer's recommendations exactly:
- Level the bathtub area.
- Install the legs or special racks that come with the package.
- Connect the siphon with sump to the tee (according to the instructions).
- Seal joints with sealant.
- Install a mixer (if necessary).
- Ground the bath for safety.
- If desired, facing the front of the plumbing or close with special blinds.
Sink
The installation of the sink is reduced to elementary actions:
- Fix the plumbing to the brackets or install it on a pedestal (depending on the model). If you decide to fix the sink using the brackets, then first mark up. Typically, the washbasin is installed at a height of 80-85 cm from the floor. Drill holes for the dowels and screw in the brackets. Install the washbasin to the fixtures.
- Connect the siphon to the sink.
- Install and connect the mixer.
- Check all joints for leaks. If leaks are found, treat problem areas with sealant.
Stock footage
As you can see, with due diligence, it is possible to arrange hot and cold water supply with your own hands. However, remember that hidden wiring of miscalculations does not forgive, so work carefully and responsibly, observing the technology of joining the selected materials. The reward for your work and diligence will be the long-term and flawless work of all communications in the house!
- How to choose a vacuum cleaner taking into account the characteristics of the house and coatings?
- What to look for when choosing a water delivery
- How to quickly create comfort at home - tips for housewives
- How to choose the perfect TV - useful tips
- What to look for when choosing blinds
- What should be running shoes?
- What useful things can you buy in a hardware store
- Iphone 11 pro max review
- Than iPhone is better than Android smartphones
 (No ratings yet)