

Heated floor in the bathhouse with his own hands water from the stove
As you know, warm air always rises, so even in a bathhouse filled with hot air, the floor always remains cold. Naturally, such a resonance between the cold floor and the high air temperature in the room cannot positively affect the health of people resting in the bath and contribute to comfort. Such procedures can lead to colds. In this regard, in order to improve the indoor microclimate, many owners equip a heated floor in the bathhouse with their own water from the stove. This method of heating the flooring is quite profitable, because you do not need to buy a special electric heating system. Today we will tell you how to do it yourself.
to contents ↑Features of the underfloor heating system
Since we will learn how to make a warm floor in the bath from the stove, it is imperative to consider the arrangement of the heat exchanger.
The following elements and components are necessary for the arrangement of such a system:
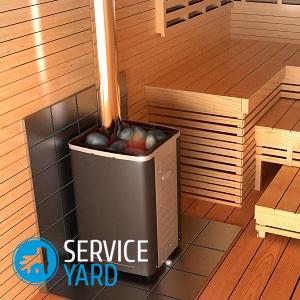
- Register of pipes or the most ordinary metal tank. Of these, you can make the main element. It is from the heat exchanger that a water floor heating system is laid in all the necessary rooms.
- Circulation pump. It is necessary for the arrival of the cooled coolant in the heat exchanger in the furnace. The system can only work without it if the stove is below floor level.
- Pipes with a diameter of 24 mm.
- Mixing unit. Given that the stove heats water to a boiling point, this element cannot be dispensed with.
- Battery tank. It is connected by steel pipes to a heat exchanger, because otherwise it cannot be positioned in any way, since it cannot be installed in the furnace itself.
- Thermal insulation materials. They are necessary to eliminate heat loss through the base of the floor covering. Energy due to them is effectively reflected, the temperature rises markedly.
Important! The main problem of this system is that the furnace does not allow you to adjust the temperature, unlike the boiler. The recommended temperature for underfloor heating is 40 degrees.
The warm floor is made in such a way that water can drain into the drain hole, it is from there that it gets through pipes to the sewer or drainage structure. To increase the moisture resistance of the floor, it is also recommended to use ceramic tiles and cement-sand screed.
to contents ↑Pros and cons of the underfloor heating system
The warm water floor in the bath, which runs from the stove, has a lot of advantages, which include the following:
- No other structural elements are capable of generating electromagnetic radiation, like a warm electric floor.
- This system is absolutely safe for humans and environmentally friendly.
- Saving.
- The ability to maintain a comfortable microclimate inside the bath.
The disadvantages of this system include the following points:
- In winter, water from the pipes must be drained so that it does not freeze, because this can lead to their rupture. Otherwise, it is necessary to periodically heat the furnace. But if you constantly heat a bath with wood, then you will not be able to save money. The most logical solution is to use antifreeze instead of water.
- Too much heat is spent on heating the battery tank, because of this the stove performs its main task worse - heating the washing room and the steam room.
- With the simultaneous heating of floors in several rooms, a large volume coolant is required, which, of course, increases the time for heating it.
- The inability to install leaking floors in the bath, because the insulation can get wet, and the system itself will lose its effectiveness.
Device options and necessary materials
Before you make a warm floor in the bath with your own hands from the stove, you should decide on a suitable version of its device.
Today, they often use such methods of their device:
- Concrete screed. This is the best option specifically for the bath, because it allows you to save on the purchase of materials, has a high level of moisture resistance due to the use of cement. But it is worth noting that it is possible to operate such a floor only a month after the installation of the screed. In addition, if the pipeline is damaged, it will be quite difficult to find a leak.
- Special polystyrene sheets. They have a reflective foil layer and special recesses for reliable fixation of heating pipes. But at the same time, they are still poured on top with a screed.
- Laying in the system of wooden floors of heating pipes. But in this case, the most accurate calculation is very important, because it is necessary to determine the place for holes in the lags in order to lay the pipeline. But such floors are the easiest to repair.
to contents ↑Important! In any design, as a heat-insulating material, you can use polystyrene, polystyrene foam boards, expanded clay mortar, mineral wool.
How to make a warm water floor from the stove yourself?
Equipped underfloor heating in the do-it-yourself water bath from the stove should consist of the following structural layers:
- Waterproofing. It is necessary so that condensation does not accumulate inside the floor during system operation.
- Thermal insulation. This layer helps prevent heat loss through the lower floors.
- Reinforcing mesh. It serves to protect the insulating material.
- Reflective foil layer. Allows to reflect thermal energy.
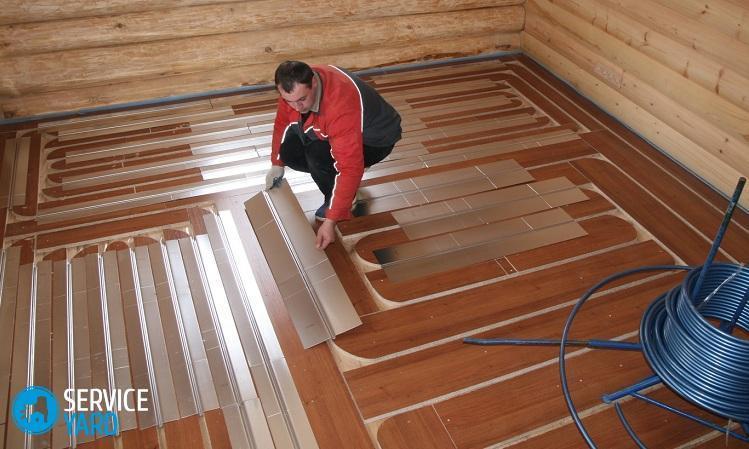
- Piping system. It is laid in a spiral so that the surface warms up evenly.
- Leveling screed. It has a slight slope for water flow.
- Finishing face coating.
Important! Before laying the floor on the ground, laying waterproofing, it is necessary to carry out a compacted sand and gravel pillow and fill up a layer of expanded clay.
Training
Before you figure out how to make a warm floor in a sweat oven, you need to properly prepare the base, organize a special drain.
To do this, follow these steps:
- Select all the soil between the walls of the foundation under the washing room. Tamp the surface. Pre-lay a sewer pipe into the foundation wall through which water will drain.
- Make a backfill of crushed stone and sand with a height of at least 15 cm, ram it.
- Warm with expanded clay. At the same time, the layer height should be 15-20 cm - it all depends on the climatic conditions prevailing in your region. Do not forget to slope towards the drain.
Heating system installation
For the arrangement of water heating, metal-plastic or copper pipes can be used. Once you have finished preparing the base of the floor, you can proceed with the installation of the piping heating pipes.
Do this according to the following scheme:
- First of all, lay a waterproofing layer of two layers of roofing material. Glue all joints with mastic.
- Lay a layer of insulating material on the floor, remember about the bias towards the drain hole.
- Lay a reinforcing mesh to protect the insulation.
- Lay heating pipes on top of the grid.
- Connect the pipes, check the system is working properly.
- Before filling the screed, install a damper tape around the room to prevent thermal deformation of the floor.
- Pour the cement-sand mortar screed, level it over the lighthouses.
- After the screed hardens, lay the floor covering.
Stock footage
As you can see, it is not difficult to arrange floor heating from the most ordinary brick stove. Using this method, you will save on the purchase of a boiler, significantly reduce energy costs. As a result of the work done, it will always be pleasant and comfortable in your bathhouse.
- How to choose a vacuum cleaner taking into account the characteristics of the house and coatings?
- What to look for when choosing a water delivery
- How to quickly create comfort at home - tips for housewives
- How to choose the perfect TV - useful tips
- What to look for when choosing blinds
- What should be running shoes?
- What useful things can you buy in a hardware store
- Iphone 11 pro max review
- Than iPhone is better than Android smartphones
 (No ratings yet)