

Heated floor in a private house do-it-yourself water
- Preparation and calculation of materials
- Choosing flooring for underfloor heating:
- Underfloor heating base
- Laying schemes for water heated floors
- The choice of insulation and fasteners
- Concrete preparation and pouring
- Concreting of a warm water floor
- Flooring
- Lightweight version of underfloor heating for wooden floors
Today, many owners of private homes install a warm water floor for additional or basic heating. They have many advantages: it evenly warms up the room, increases comfort, does not require additional energy costs, since it works from one boiler with radiators. In this article, we will consider the question of how to install a warm floor in a private house with a water heater, even without experience in carrying out such work.
to contents ↑Preparation and calculation of materials
Such responsible work should begin with the planning and preparation of all necessary materials. Strictly speaking, accurate calculations can only be carried out by specialists who have information about the level of heat leakage in a particular room. But for individual needs, as a rule, approximate calculations are used that fully satisfy the set requirements.
To begin with, you should draw a plan for the location of the pipes of the warm floor water in a private house. The most obvious and understandable will be a diagram drawn on a sheet in a cell, on which the system can be calculated based on the square of the room. Each cell will correspond to one step, i.e. the distance between the pipes of the system. For a moderate climate zone:
- With sufficiently good insulation of the windows and the house, the distance between adjacent turns of the pipe can be made about 15-20 cm.
- If the walls are well insulated - 10-15 cm.
- In spacious rooms, where some of the walls are cold and some are warm, a variable step is taken: near cold walls, the distance between adjacent turns of pipes is not too large, but as it approaches warm walls, it increases.
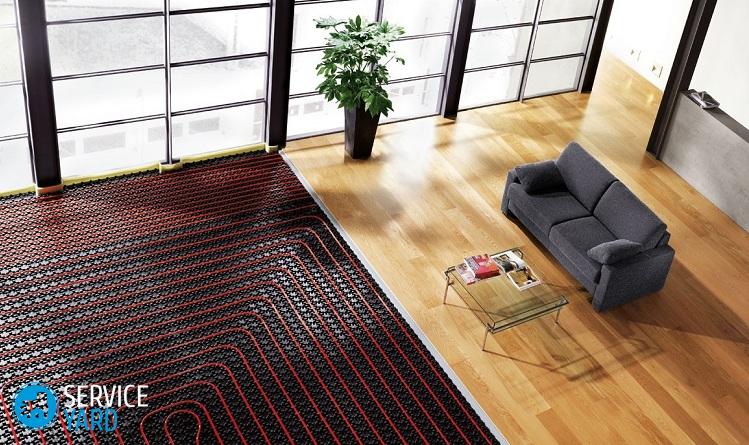
Choosing flooring for underfloor heating:
- A serious mistake is made by those who are going to lay a thick wooden covering or parquet on a warm water floor. Wood does not conduct heat well, which is why it will greatly impede the heating of the room. The efficiency of such heating can be even worse than that of the radiator, in turn, the cost of heating is quite large.
- The ideal coating for underfloor heating is ceramic, stone or porcelain tile. When heated, it will be great to keep warm, and this is the best option for a bathroom or kitchen. In the rooms where the underfloor heating is made, children like to play very much, and just walking barefoot is much more pleasant than on wooden parquet.
- A slightly worse option for flooring, more appropriate for a bedroom or guest room - laminate or linoleum. Such materials transmit heat well, without lowering the efficiency of water heat supply. In this case, the laminate must be selected with a minimum thickness, and linoleum - without a substrate with insulation.
to contents ↑Important! When heated, many artificial materials are able to emit harmful fumes into the air. That is why flooring with chemical additives should be marked by the manufacturer of the product on the possibility of their use in residential premises on warm floors.
Underfloor heating base
If we are talking about housing with concrete ceilings, then the best option for a base under the underfloor water floor with your own hands in a private house is a concrete screed with water heating.
Important! The same method is also applied to the first floors of (basement) private cottages if the base of the floor is on a sand cushion that is located directly on the ground.
In houses where there are wooden floors, this option will not work. Wooden floor beams simply cannot withstand the heavy weight of concrete screeds, no matter how thin. In this case, a lightweight version of underfloor heating is used, which we will talk about a little later.
Installation of underfloor heating with your own hands begins with a thorough preparation of the base, which should be smooth, without any depressions and protrusions. The maximum allowable difference can be 5 mm.
to contents ↑Important! If the depth of the surface defects is 1-2 cm, then you will have to pour and then even out a thin layer of fine crushed stone (granite screening) with a grain size of up to 5 mm. On top of the leveling layer, it will be necessary to lay the film and, in the process of laying the thermal insulation, walk on wooden boards. Otherwise, the leveling layer itself will serve as a source of bumps.
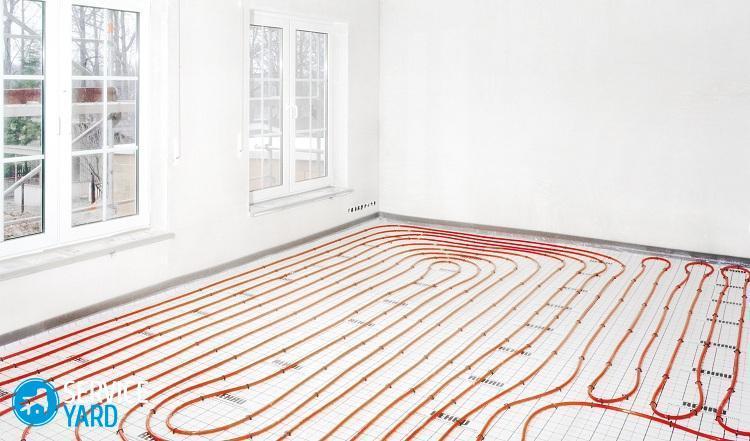
Laying schemes for water heated floors
The most common schemes for laying water warm floors are a spiral and a snail:
- The snail evenly warms up the entire floor area.
- But with a spiral, you can provide a higher level of heating in the coldest zone of the room. To do this, the first pipe branches through which hot water will be supplied are laid there.
According to a previously prepared plan, the exact length of the pipe is determined.
Important! For underfloor heating, use only a single piece of pipe. If the room area is large, then several heating circuits should be planned. Moreover, the pipe length of each of these circuits should not exceed 100 m. Otherwise, too much pressure will be required, which is necessary for the normal flow rate of hot water. In area, this roughly corresponds to 15 square meters.
Do-it-yourself warm water floor in a private house is best done from a metal-plastic pipe, the diameter of which is 16 mm. It easily bends with a rather small radius, and it is much more convenient to work with it than with a pipe made of cross-linked polyethylene. Pipes with a diameter of 20 mm are undesirable, because a large diameter will require an increase in the thickness of concrete, which will negatively affect the efficiency of the heating system.
Typically, the consumption of pipes per 1 square meter of area is:
- 10 meters with a step of 10 cm.
- 6.75 meters with a step of 15 cm.
The choice of insulation and fasteners
So that the heat does not go down, on the base you need to lay a layer of dense foam.
Important! The density of the insulation should be chosen at least 25, and better - 35 kg / cubic meter. Lighter types of polystyrene simply doubt the weight of the concrete layer.
Heater and heat reflector
The optimal thickness of the insulation is 5 cm. When laying on the ground or, if necessary, higher protection against cold, when the floor below is a poor or unheated room, the thickness of the insulation layer can be brought up to 10 cm.
To reduce heat loss, it is recommended to lay a heat-reflecting screen consisting of a metallized film on top of the insulation. It could be:
- Reflective foam screen that adheres to radiators.
- Penofol (metallized foamed polyethylene).
- Plain food grade aluminum foil.
The metallized layer quickly deteriorates due to the aggressive effects of concrete, so the screen itself also needs to be protected. Such a protective layer will be a plastic film, which is often used for greenhouses in greenhouses. The thickness of this film should be approximately 75-100 microns.
Moreover, it provides the necessary humidity for the maturing concrete screed throughout the entire period of its solidification.Pieces of the film should be overlapped, and the joints carefully glued with tape.
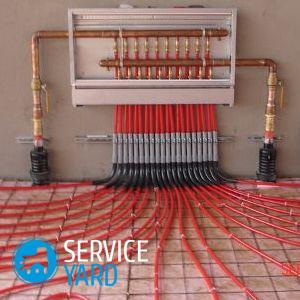
Pipe fasteners
Pipe fasteners are installed on top of the insulation. Their purpose is to fix the neighboring branches of the pipe and arrange it on the floor in strict accordance with the preliminary scheme. Fasteners hold the pipe until the concrete screed acquires the necessary degree of hardness. The use of fasteners facilitates the installation of underfloor heating underfloor heating in a private house and guarantees the correct location of the pipe in the thickness of the concrete pillow.
Fasteners can be special metal strips, a welded metal mesh, plastic staples that fix the pipe to the foam base:
- Metal strips are used with increased thickness of the concrete pillow. They raise the pipe slightly with respect to thermal insulation, so that it is slightly closer to the upper surface of the concrete pillow. The pipe simply snaps into the curly notches of the slats.
- The metal mesh not only secures the pipe, but also reinforces the concrete pillow layer. The pipe is fixed to the grid using pieces of wire or plastic clamps. At the same time, the consumption of fasteners is 2 pieces per 1 linear meter. In places of curvature, additional fasteners can be used.
- Plastic staples are mounted manually. They pin the pipe to the foam as it is laid. Semi-industrial warm floors are made using a special stapler. However, its purchase is justified only with intensive professional use.
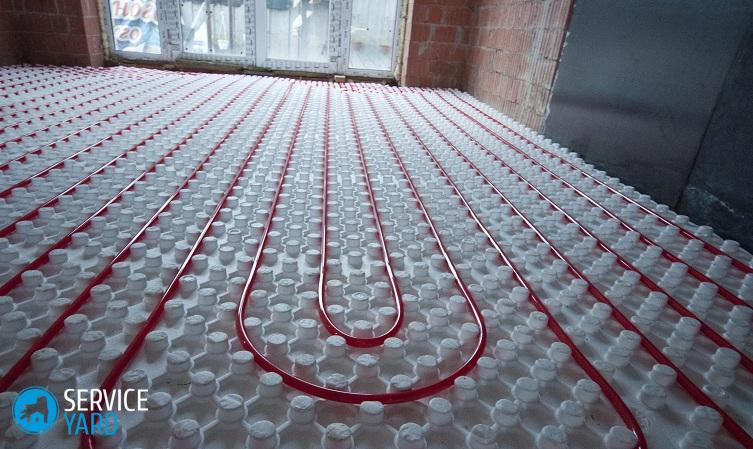
Recently, manufacturers of underfloor heating systems have begun to offer another reasonably convenient solution - special sheets of dense expanded polystyrene with a profiled surface. As a rule, the surface of such sheets is the intersection of grooves or rows of protruding elements between which heating pipes are laid.
The surface of such sheets is smooth, extruded, all pores are closed, while an additional waterproofing film is not needed for it. Having at its disposal a special thermoset, grooves in polystyrene foam can be made independently. However, to carry out such work, at least minimal experience is required.
to contents ↑Important! Plastic pipes are delivered in bays. In the process of laying the bay is rolled along the path of the pipe. Do not pull the pipes from the lying bay, as this will cause it to twist and can lead to the burning of the inner layers.
Concrete preparation and pouring
It is possible to stage the pouring of pipes with concrete when installing an underfloor heating floor in a private house in stages only after they are completely laid, correctly connected to the collectors, and also filled with a coolant under a pressure of 4 bar.
Important! Before pouring, it is necessary to withstand the pipe under pressure for at least a couple of days. If a leak is detected, it must be removed immediately. If the system itself has not yet been installed, instead of water, air should be pumped into the pipes using a compressor and the pressure should be fixed by ball valves.
Immediately after the injection, the pressure may decrease slightly due to the straightening of the pipes. In the process of pouring and hardening of concrete, the pressure is monitored using a connected pressure gauge.
In order to compensate for thermal expansion along the walls, a damper tape is attached. The temperature expansion of the concrete pillow should be 0.5 mm per linear meter, with a temperature increase of 40 degrees. In the event that the heating is only 20 degrees, then the expansion will accordingly be half as much. You need to multiply the expansion by the length of the longest section of the concrete floor and compare the obtained value with the thickness of the damper tape.
As a rule, for ordinary houses, it is enough to lay the tape only along the walls and at the doorway. Also, the damper tape plays the role of thermal insulation of the warm floor and walls.In this way, cold bridges that cause unnecessary heat leakage are eliminated.
In some cases, expansion joints are additionally made:
- If the length of either side of the room is more than 8 meters.
- The floor area exceeds 30 square meters.
- The length and width of the room are more than doubled.
- The shape of the room has several bends.
For an extended warm floor, a compensating seam with damper tape is arranged every ten meters. So that the movement of concrete pillows in these places does not break through the pipe, a rigid plastic corrugation or large-diameter pipe should be put on it. The entry of the protective pipe into the concrete cushions is at least 0.5 m from each side.
Important! Each circuit is recommended to be placed on its site and not to allow frequent intersection of pipes, as well as the expansion joint.
If, according to the layout plan, there is an accumulation of warm pipes in one place, for example, near the collector, then a part of the pipes must be fitted with a heat insulator sleeve. This will make it possible to avoid local overheating, and it is also better to keep heat for the desired sections of the floor.
to contents ↑Concreting of a warm water floor
If concrete for pouring a warm floor is not brought, but done on the spot, then the following components will be required:
- Washed river sand - 1.9 in. hours
- Cement brand 300 (400) - 1 weight part.
- Crushed stone measuring 5-20 mm - 3.7 in. hours
Important! This is the composition of heavy concrete, the weight of which is 2.5 tons per 1 cubic meter. m of finished material.
But many refuse sand in concrete for warm floors. This is due to its low thermal conductivity. Therefore, in practice, cement-gravel mixtures are often used, the composition of which is as follows:
- Cement - 1 bucket.
- Granite crushed stone - 5-20 mm - 2 buckets.
- Water - 7 l (if the solution is very thick, you can add another 1 l).
- Fine granite screenings - 4 buckets.
Granite conducts heat remarkably, and such concrete has a significantly lower thermal resistance. In addition, it is worth introducing a reinforcing fiber, which is a small plastic fiber.
Important! The composition of any bulk floor must necessarily include a plasticizer. Its amount depends on the brand and purpose of the drug. Moreover, the plasticizer should not be any, but designed specifically for a warm floor.
General rules for filling:
- If the pipe is fixed on strips or staples, then on top of it you need to lay a reinforcing mesh. And the height of the concrete screed should be chosen 5-10 cm.
- In this case, it is necessary to provide at least 3 cm of concrete above the pipe. A smaller layer can lead to cracking, and a too thick concrete pillow will increase heat transfer losses.
- With the right choice of concrete and an acceptable temperature, it begins to set after 4 hours. To maintain normal humidity, it must be covered with a waterproof film, and in the process of drying the surface - pour it with water.
- Already after 12 hours, the hardened concrete will be able to support the weight of one person. However, its full ripening occurs no earlier than 28 days. All this time it is necessary to take care of its humidity, and also to maintain a sufficiently high pressure in the laid pipes. Only after the specified time has passed, the first thermal tests of such a floor can be carried out.
to contents ↑Important! As during the first test of the underfloor heating floor with your own hands in a private house, you cannot subsequently quickly heat it to high temperatures.
Flooring
On the finished, completely dried concrete base, you can glue ceramic tiles or some other floor types of coatings. In this case, glue that is intended for underfloor heating should be used.
to contents ↑Important! If the tile falls just on the expansion joint, then one part should be glued, and the second should be put on silicone glue. Silicone absorbs thermal movements of the base, so that the tile does not crack from overvoltage.
Lightweight version of underfloor heating for wooden floors
As mentioned above, for wooden floors, it is necessary to make a light warm floor without a concrete pillow. In this case, the sequence of work may differ slightly, depending on the design of the floor and the condition of the old floor:
- So that the heat does not go down, it is necessary to lay a heater under the pipes. It can be placed between the overlap lags, and then it is better to use mineral wool. Or it can be laid on the old rough floor - polystyrene foam with a density of 25-35 kg / cubic meter is already needed.
Important! To prevent condensation, it is worth laying a vapor barrier membrane under the mineral wool, and fill the first draft floor on top of the logs.
- As well as for a concrete floor, it is recommended to lay a heat-reflecting screen of penofol or foil on the insulation. At the same time, all seams and joints must be carefully glued with tape.
- Directly on the polystyrene foam, it is necessary to lay logs to which to nail boards of the rough floor. In this case, between the boards there should be gaps of approximately 2 cm for laying the pipe.
Important! The same gaps should be provided at the ends of the floor boards. Otherwise, you will have to choose lateral grooves for the pipe, and this can cause damage to the boards.
- In order for the heat to be distributed evenly on the floor, the pipe must be laid not just in the grooves, but in specially designed metal gutters that are designed for this purpose. The metal transfers heat well over the entire surface and evenly heats the finish. Advice on his choice was given a little higher - it can be a laminate that can work with heating, or a hard polymer coating. Thick parquet for warm floors is less suitable.
Important! Compared to concrete underfloor heating, the lightweight construction is much faster and cheaper. Another advantage is the ability to repair pipes in the event of an accident. Problems with a pipe in a concrete floor can only be eliminated by completely replacing it. But the wooden floor also has a drawback - this is significantly less thermal power.
Properly equipped with a do-it-yourself stage-by-stage warm water floor in a private house is another step towards convenient and comfortable living conditions for the whole family. But, even if for some reason you cannot perform these works yourself and are forced to invite specialists, the knowledge gained will help you to take an active part in this process and to monitor the quality of the assembled system.
- How to choose a vacuum cleaner taking into account the characteristics of the house and coatings?
- What to look for when choosing a water delivery
- How to quickly create comfort at home - tips for housewives
- How to choose the perfect TV - useful tips
- What to look for when choosing blinds
- What should be running shoes?
- What useful things can you buy in a hardware store
- Iphone 11 pro max review
- Than iPhone is better than Android smartphones
 (No ratings yet)