

Do-it-yourself warm water floor
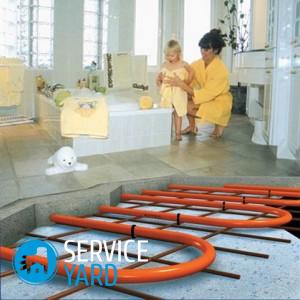
Nowadays, you will not surprise anyone with warm floors. In many private homes where there is autonomous heating, the owners install their own underfloor heating underfloor heating. Installation is not easy, but in the end, a durable heating system is obtained, with its help you can achieve greater savings and comfort. You can reduce the cost of installation if you install the water heated floor yourself. You will need to buy the necessary materials and elements, prepare the surface of the bases, according to the established requirements. In this article, we will consider what stages the process of installing a water heated floor with your own hands consists of, and we will tell you all the nuances of designing and performing this work.
to contents ↑Advantages and disadvantages of water heated floors
Before you figure out how to make a warm floor with your own hands, consider its pros and cons.
Benefits:
- Uniform heating of the entire room, due to the effective redistribution of heat.
- Provides natural indoor air circulation.
- Compatible with any kind of coating.
- The ability to connect to central heating or install individual heating.
- Reducing heating costs by about 20-40%, when compared with radiator.
- Independent of power supply.
- The ability to adjust the temperature in different rooms.
- Minimal costs for DIY installation.
- The room has a beautiful view, as there are no visible heating pipes and there are no radiators.
- Long term of operation.
Disadvantages:
- The room warms up, depending on the area of the room, about 4-6 hours.
- The complexity of the design, if you use underfloor heating the only source for heating the room.
- Reducing the height of the room, since the floor rises by 10-12 cm.
- Do not use such floor coverings as palace, carpet, carpet.
- Possibility of leakage and flooding of neighbors from below or basement.
to contents ↑Important! Installation in a multi-storey building is prohibited or you need to get special permission for installation.
DIY water floor heating
Do-it-yourself installation of a water heated floor consists of four stages:
- Create a project.
- The choice of building materials and equipment.
- Installation of underfloor underfloor heating do-it-yourself.
- Check and first start of the system.
After completing these steps, it is necessary to lay the flooring. Consider all the steps in turn.
to contents ↑Designing a warm floor - stage 1
First you need to draw up a project, make sure that there are no obstacles to installing the system in the room. These may be:
- The height of the room. The thickness of the mounted system is 100-120 mm, due to this, the height from the floor to the ceiling will decrease.
- Door installation location. The height of the doorway should be 2.2 m, when installing the system, the floor height will rise, and you will either have to increase the doorway at the top, or make a door to order.
- Placement of windows. If they are located on the north, north-west or windy side, it is necessary to increase the power of the entire system in order to compensate for heat loss.
Important! It is impractical to mount a water heating system if the estimated losses are more than 100 watts per square meter.
- Bearing capacity of slabs or floor beams. Evaluate whether the slabs and beams can support the weight of the entire water heating system.
If there are no obstacles to the installation of the device, you can safely proceed to the design.
Sex calculation
First you need to calculate the required amount of material. It depends on all the parameters of the heated room, as well as the technical characteristics of the equipment of which it consists. The calculation of a water heated floor is based on the following data:
- The area and height of the room.
- Material of ceilings and walls.
- Type and degree of thermal insulation.
- Type of flooring.
- Material and pipe diameter.
- The power of the element that produces heating.
- Desired temperature conditions.
Next, a drawing is made that displays the place where the main equipment will be installed, the method and step of placing the pipes.
How to make a water warm floor correctly
How to make a warm floor correctly? First of all, pay attention to such nuances:
- You can not install heating elements in places where the furniture is placed so that it does not overheat and does not dry out.
- The length of the contour should not be more than 90 m. The optimal length of the contour is considered to be 50-60 m with a pipe cross section of 20 mm.
Important! If necessary, install two circuits of the same length. Short contours provide uniform heating throughout the area.
- The laying step should be 10-50 cm.
Important! If you use a water heated floor as an additional source of heating, then the pipe laying step should be 30-50 cm, and if as the installation of the main one, 10-30 cm.
- Install thermostats - they reduce the cost of using the system and prevent overheating.
Heated floor from central heating in the apartment
Installing a heated floor with your own hands in the apartment has a number of difficulties. First you need to submit the project to the co-owners' community or housing office and the heating system in your area. Then, after approval, get a conclusion about the possibility of installing the system.
Important! Most often, owners of apartments in new houses get permission, since there is a separate riser for pumping in case of breakthrough of hot water.
Installation of a water heated floor in the bathroom is possible by connecting through the exit to the coil from the heated towel rail. Permission is not required for heating small areas.
Types of underfloor heating systems in a private house
During the design, the type of the water floor heating system is selected:
- Flooring system - use polystyrene or wood flooring.
- Concrete system - pipes are poured with concrete (screed is made).
Accessories for water floor heating - stage 2
Water floor heating consists of a complex system of pipes with a coolant. Let's consider what components are necessary for its device.
Water floor heating boiler
The most common option is to connect to a gas boiler. It can also be connected to central heating.
Electro-water floors can also be used. Their heating cable is inside the pipe, the floor warms up evenly. Such floors can be installed without problems in apartment buildings. The disadvantage of this system is the high cost of electricity.
Important! The design capacity of the boiler must exceed the total power of all floors by 15-20%.
Circulation pump
The pump is needed to provide movement in the coolant system. If the area of the house is more than 100 square meters. m, then the pump, which is built into the boiler, will not cope with the load.
Pipes:
- Copper is an ideal option. They are durable, with high heat dissipation, but their cost will increase the budget of the entire installation.
- Metal-plastic - occupy a leading position in the ratio of price and quality. They are light in weight and high temperature, bend easily, the composition eliminates the appearance of accumulations and corrosion in them.
- Polypropylene - have a low price, but there is a high probability of acquiring low-quality goods.
- PEX - made of cross-linked polyethylene, reliable, but need rigid fastening, because they are straightened during heating.
Important! When using this type of pipe, reduce the mounting step of the holders by 2-3 times.

Insulation
You can use such materials as thermal insulation:
- Styrofoam.
- Foiled polyethylene.
- Mineral wool.
Important! The thickness of the insulation on the basement, first floor, above the basement should be thicker.
Heat meter
Upon receipt of a permit for the installation of an underfloor heating water system in an apartment building, it is necessary to install a heat meter in the apartment.
Reinforcing mesh
This grid will allow reinforcing concrete screed after laying the pipe system.
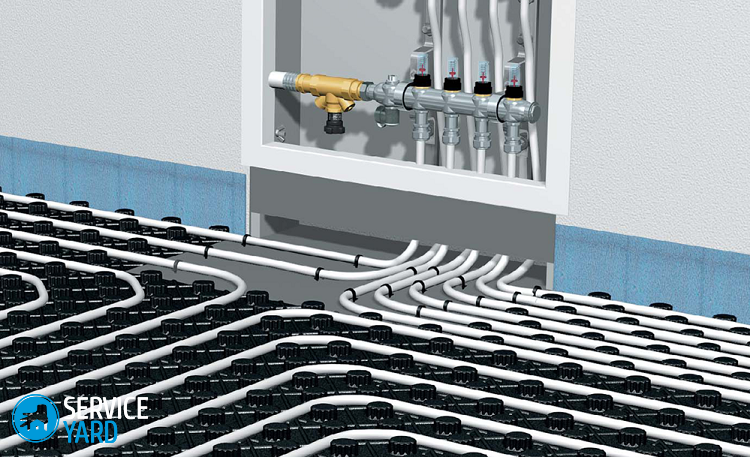
Manifold cabinet
It is installed for installation with the heating supply line of adjusting elements and pipe joints.
Materials for screed device:
- Concrete.
- Damper tape.
- Fasteners.
DIY floor installation - stage 3
Do-it-yourself installation of a warm floor consists of a phased implementation of actions.
Installing the manifold cabinet
It consists of the following elements:
- Collector.
- Pump.
- Drain outlet.
- Vent valve.
The size of the collector depends on its configuration. The collector must be installed at the same distance from all circuits. If this is not possible, then near one of the longest contours.
Important! Allow free space for bending pipes when installing the manifold. Installation of pipes is allowed only from below.
Foundation preparation:
- Eliminate all differences in floor heights, clean the entire surface of debris.
- Lay the insulation material on the prepared surface.
- Install waterproofing.
Important! To ensure an even distribution of heat over the surface, level the floors under the underfloor heating.
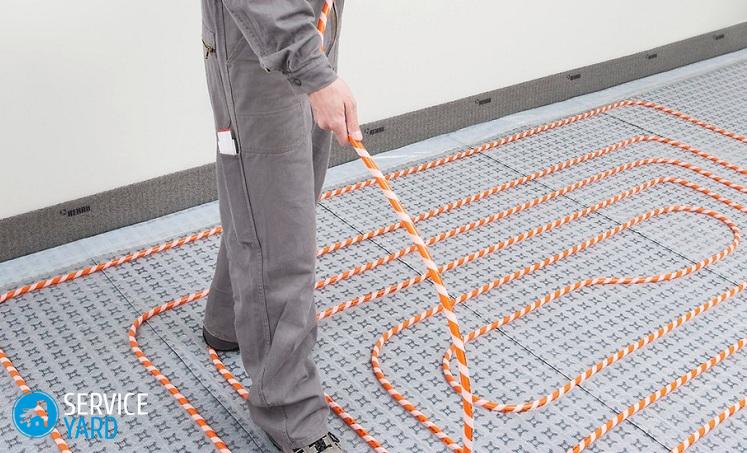
Pipe installation
Pipe laying can be done in several ways:
- Snake - the pipe passes from the heater along the outer wall, after which it comes back undulating. Suitable for small rooms.
- Snail - the installation of pipes is made around the perimeter and tapers towards the center. To ensure the return of the coolant, it is necessary to lay pipes through a row. Used in rooms larger than 40 square meters.
- A meander or a double snake - snake loops are laid in parallel, make it possible to organize movement through the pipes of a cooled and warm coolant.
Important! It is best to start installation from the outer or coldest walls of the room.
Here are some more tips that will come in handy for you at this point:
- For the correct layout, first mark the surface of the floor. Use only solid pipes or very reliable joints.
- Pipe laying begins by connecting one of its edges to the manifold.
Important! Laying the pipe should be at least 7 cm from the wall. Near the outer walls, this distance can be reduced.
- After laying the pipes, they must be fixed. This can be done using dowels and tie a pipe to them using a copper wire, or tie the pipe to a laid reinforcing mesh.
- Using a ribbed polystyrene substrate will simplify your work. It will help to lay pipes in rows and provide thermal insulation.
- Upon completion of installation, connect the free edge of the pipe to the return manifold.
Hydraulic test
Pressure testing provides for the inlet to the system under high water pressure. For verification, it is recommended to use a pressure that exceeds the calculated 2 times. In the first half hour of the test, you can reduce the pressure by no more than 10%, and in the next from 2 to 15% of the initial value. Verification time is one day or more. If during the test there are no violations and the floor is warming evenly, then you can continue to do the work.
Floor screed
For screed, you can use:
- Plasticizer-added concrete.
- A finished mixture that conducts heat well.
Screed height 3-7 mm. The solution is poured with a complete system with the pressure set during the test. Concrete hardening is 28 days. The pour time of the mixture is determined by the manufacturer.
to contents ↑Important! The device provides expansion joints on surfaces with an area of more than 40 square meters. m
Launching a water floor heating - stage 4
After the floor screed has completely dried, the system can be started. It will reach the set parameters within 2-3 days.
to contents ↑Fine finish
The underfloor heating floor is ready-made and covered with materials for decoration. The most popular in our time are laminate and tile.
Laying a laminate on such a warm floor occurs with the following nuances:
- Laminate should be of high quality. Most often, a laminate that is suitable for underfloor heating is labeled “Warm wasser”.
- A heat insulator does not fit under it.
- For ventilation of this floor covering, it is necessary to leave a gap around the perimeter with a thickness of about 1-1.5 cm, which is then covered with a skirting board.
- Before laying, the laminate is placed on the entire floor so that it gains its temperature.
to contents ↑Important! The laminate does not create any difficulties to use as a floor covering for a water heat-insulated floor, but masters recommend using tiles under a water-heat-insulated floor. The tile has a higher thermal conductivity and does not produce any harmful fumes to the residents' health.
Rules and recommendations
Do-it-yourself warm floor water, will last a long time, if you follow the tips for their operation:
- Make a gradual set of the desired temperature. Do not run the system to maximum after a long period of inactivity. Raise the temperature gradually by 4-5 degrees per day.
- The temperature of the incoming coolant should not exceed 45 degrees.
- Do not turn on / off the system often.
- Provide optimum humidity in the room.
Stock footage
Having correctly selected the equipment that is now sold for every taste and budget, and using the step-by-step execution of work described above, as well as the rules and recommendations, you will install a do-it-yourself underfloor heating floor that will please you for many years without any special difficulties and problems.
- How to choose a vacuum cleaner taking into account the characteristics of the house and coatings?
- What to look for when choosing a water delivery
- How to quickly create comfort at home - tips for housewives
- How to choose the perfect TV - useful tips
- What to look for when choosing blinds
- What should be running shoes?
- What useful things can you buy in a hardware store
- Iphone 11 pro max review
- Than iPhone is better than Android smartphones
 (No ratings yet)