

Do-it-yourself siphon installation
A siphon is a pipe or several pipes with a bend that serve to drain dirty water into the sewer. Due to the bending, a little water remains in the pipe, forming a sump, which prevents noise and unpleasant odors from entering the sewer from entering the room. Installing a siphon for a sink with your own hands will not be difficult, but it is important to take into account all the nuances during this process. Mounting, depending on the type of siphon design, may vary slightly. Below we will consider what types of siphons are, how to install them correctly.
to contents ↑Siphon and its types
Siphon - a water lock that does not allow sewage gases to enter the room. It is mounted near the entrance to the sewer next to the plumbing fixture.
Consists of such spare parts and accessories:
- Branch pipe for water discharge.
- Protective grill.
- Gasket for rubber pipe.
- Plastic nuts.
- Rubber conical cuff.
- Adjusting cuff from rubber.
- Stainless steel screw for screed.
Important! Some manufacturers make this part from ordinary iron with a deposition of chromium and nickel to reduce the cost of the product. Such components are quickly destroyed and rust.
- The drain element.
- Drain gasket.
- The case is plastic.
- Rubber drain plug.
- Flexible hose, corrugated pipe, plastic pipe for sewer.
- Instruction
Important! Start installing the plumbing device by reading the instructions.
There are several types of siphons. Between themselves, they differ in the material from which they are made, in appearance, as well as in design features. To make the right choice, before buying, you need to understand the options for this plumbing device:
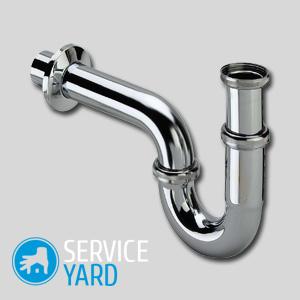
- Tubing - are installed in the bathroom under the sink. Beautiful and compact. It looks like a curved pipe. Most often, the lower knee is removed for cleaning. The disadvantage is a small size hydraulic lock, so the water from it evaporates quickly, an unpleasant odor may appear if you do not use the water for several days.
Important! It is not recommended to install in the kitchen, because it will often clog.
- Corrugated - similar to pipe, but made of plastic flexible corrugated pipe with a connecting node. Plus - connecting this type to any sink. Minus - the inability to install in unheated rooms, the rapid accumulation of debris, as well as the loss of strength over time.
Important! It is impossible to pour boiling water and chemicals into sinks with such a siphon.
- Bottle - similar to a cylindrical or conical vessel, made of plastic, steel, brass, cast iron or other materials. On the side wall on top of the product there are holes for connecting pipes, its bottom is disassembled. To clean the product from clogging, you just need to unscrew the bottom.
Important! There are model data and with an additional corrugated pipe, which is convenient when docking with a sewer pipe.
- Branched - they can connect several pipes from household appliances and sinks. They look like bottle ones, but they have a slightly more complicated design.
- Flush mounting - the most expensive. Suitable for mounting on open shelves, under the sink, with wall mounting. The whole structure is hidden in a special niche behind a decorative screen.
Preparatory work
Before you put the siphon on the sink, check the quality and completeness of the product during the purchase. Get the right materials for installation.
Necessary materials and tools:
- Siphon.
- Silicone sealant.
- Gaskets.
- Plastic insulating tape.
- Flat screwdriver.
- Adjustable wrench.
- Rags and buckets.
Removing the old system:
- Shut off the water supply.
- Place a bucket under the old device.
- Remove the bolt from the sink drain filter.
- Unscrew all siphon parts with an adjustable wrench or hands.
- Close a pipe temporarily with a rag.
- If the coupling has lost elasticity, install a new one.
- Unscrew the pipe between the drain hole and the siphon.
- Clean the socket and drain from old sealant and dirt.
- Install a new one.
to contents ↑Important! Dismantling a cast-iron siphon is a difficult and dangerous job. To dismantle it, use a hammer and a chisel. Do not get hurt while doing work.
Bottle siphon assembly:
- Place a blue gasket on the threads of the upper collapsible siphon.
- Screw the bottom.
- Put on the spout tube, two plastic tightening nuts and a ring gasket.
- Insert the hole on top of the spout tube, tighten the plastic nut, not much.
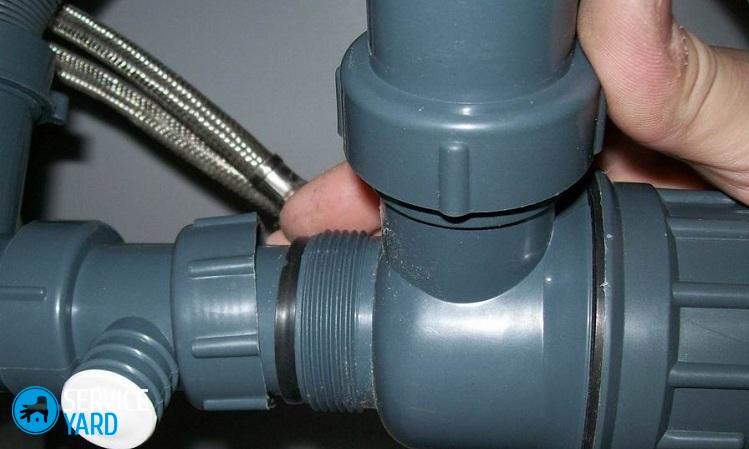
- Put the gasket and nut on the corrugated hose, insert the hose into the hole on the side of the siphon and tighten the nut.
- Put the gasket on the top hole of the spout tube and screw in the drain with nut.
Siphon installation on the sink
If you purchased an assembled siphon, first disassemble it and check if all the parts are tightened and secured well.
Step-by-step procedure:
- Press the siphon with a thick gasket to the sink drain - it should fit snugly around the entire perimeter.
- Insert the mesh with gasket and screw into the drain hole, screw the screw and tighten it completely.
- Insert the corrugated tube with gasket into the drain socket, tighten with a nut.
- Put a rubber seal in the sewer pipe.
- Install the bell of the corrugated pipe in the sewer.
- Inspect the structure for leaks by opening the water tap.
Important! When mounting the siphon on a double sink - scroll the outlet pipe under each sink hole and connect to the siphon.
Siphon installation completed.
to contents ↑Important! The installation of siphons, to which dishwashers and washing machines are connected, are installed in the same way, only additionally the hoses from the equipment are screwed onto the siphon taps.
Siphon installation tips:
- Check the product for all parts in the kit upon purchase.
- All siphon elements must be clean, dry during assembly.
- In order for the desired slope to form and the water to drain well, the height of the outlet of the product from the floor should be higher than the height to the inlet in the sewer pipe.
How to clean the siphon?
Use one of the methods to clean the siphon when clogged during operation:
- Pour hot water into the sink or sink to dissolve the fat.
- Use household chemicals to flush pipes.
- Substitute a basin or bucket, remove the bottom plug and untwist the knee and clean it by hand.
If the siphon began to leak, then:
- Seal it with the sealant at the points of docking with the sink.
- Screw the plug tight.
- Clean the old sealant, treat with a new layer all the parts that have been repaired.
to contents ↑Important! How long the siphon will last for you depends on the quality of the device and the correctness of its installation.
Stock footage
We examined how to put a siphon on the sink, how to choose it correctly and dismantle the old product. We hope that now you can complete this process easily and correctly.
- How to choose a vacuum cleaner taking into account the characteristics of the house and coatings?
- What to look for when choosing a water delivery
- How to quickly create comfort at home - tips for housewives
- How to choose the perfect TV - useful tips
- What to look for when choosing blinds
- What should be running shoes?
- What useful things can you buy in a hardware store
- Iphone 11 pro max review
- Than iPhone is better than Android smartphones
 (No ratings yet)