

Sound insulation of the floor of the apartment under the screed
Soundproofing an apartment is one of the most important signs of good housing. If the flooring is laid directly on concrete slabs, then the problem of noise coming from neighbors is often quite acute. The problem is also that the floors are not perfectly laid. In addition to technical holes, there are always cracks and cracks. Sound insulation of the floor of the apartment under the screed helps minimize noise from below. An ordinary screed, even made very high quality, does not solve the problem of sound insulation. It only closes defects in the ceilings. Of course, music, voices, sounds from the TV will not be so audible, but the screed does not save from vibration noise (drill, subwoofer, stamping). It is necessary to use additional soundproofing material. Which is better to choose - we will consider in this article.
to contents ↑Screed Classification:
- Dry. This screed is also called the "team." This is a layer of gypsum fiber insulation boards laid on expanded clay. Such a screed is convenient in that immediately after laying it is possible to deal with the finishing floor covering.
- Wet This is a layer of concrete mortar about 50 mm thick. A wet screed is poured over the subfloor or over the hydro and sound insulation layers.
Important! The disadvantage of this option is that it takes some time for the concrete to harden. Only then can you start finishing. In order for the screed to freeze completely, it takes up to 2 weeks.
- Semi-dry. Here the concrete mortar replaces the concrete mix with fiberglass and a small amount of water. Such a screed freezes for about a week, after which you can begin to finish the floor.
to contents ↑Important! A good soundproofing effect can be achieved only if the screed is made according to the “floating floor” principle, that is, it has no connection with either the walls or the base of the floor. A soundproofing layer is used between the screed and the rough floor, and a damper around the perimeter.
Foundation preparation
This is a mandatory step. It is necessary to inspect the base, cover all potholes and cracks with mortar, paying particular attention to the holes for communications. There may be gaps around them. After all visible defects have been eliminated, you need to clean the base of debris.
to contents ↑Important! If you use a wet screed, it is advisable to clean the surface from dust.
Wet Soundproofing
Wet screed has been used in decorating for a long time. Its advantages are that it turns out an even and solid foundation for flooring. A layer of concrete mortar helps level the floor even with significant differences in height.
The disadvantage of this method is that all the work is pretty dirty. Mineral wool and its derivatives, as well as noise insulation, are used as sound insulation for wet screed.
Important! In order not to flood the neighbors from below, it is necessary to carefully insulate the screed.
Work order:
- A damper tape is fixed around the perimeter of the room and around the communication pipes. The height of the tape is greater than the planned level of screed.
- Lay a layer of waterproofing material so that the film of the waterproofing layer covers the damper tape. Joints are fastened with adhesive tape.
- They lay a reinforcing mesh with an excess of 2 cm in relation to the soundproofing material. Separate mesh elements are fastened together.
- Put lighthouses on a dry cement mix. As a rule, the height of the lighthouses is about 4 cm.
- The distance between the beacons is selected based on the length of the rule.
Important! Before proceeding with further work, it is necessary that the solution holding the beacons is completely frozen.
- Pour cement mortar. Cement grade not lower than M-300.
- Level the surface along the guides.
- After the solution has completely hardened, the surface is ground.
- At the end of the work, cut off the excess damping tape in height and fill in vibration damping sealant.
Semi-dry method
Preparation and stages of work are in many ways similar to the “wet” methodology. This screed dries twice as fast as classic wet.
After carrying out preparatory work, which are no different from the method described above, proceed to laying the screed:
- Pour the first, 2-centimeter, “draft” layer.
- Lay a reinforcing mesh.
- Pour the top layer of the mixture. The surface is leveled with pre-installed guide beacons.
- After the mixture has hardened, the floor is ground, and the excess damping tape is cut off and filled with a vibration-absorbing sealing compound.
Sound insulation floor screed: “dry” way
The advantage of this method over the previous ones is that it is light in weight and relatively easy to mount. The material itself, which plays the role of a screed, has a soundproofing effect. As an additional noise insulation, vibration damping materials, such as “Soundproof” or “Soundproofing” are used.
Important! Problems may arise if the floor has significant differences in height. Local application of mortar as a screed does not solve the problem - the floor will sag over time.
The execution algorithm is as follows:
- Alignment starts from the far corner of the room towards the exit. First, a vapor barrier layer is laid over the subfloor. The joints of the vapor barrier are overlapped and secured with adhesive tape (continuous tape). The edges of the vapor barrier material penetrate the walls higher than the planned level of the finish floor.
- A tape-damper is fixed around the perimeter of the room and around the communication pipes. The tape is fixed so that its height coincides exactly with the height of the backfill.
- A soundproof layer is laid. The material is lapped. The individual elements of the sound absorber are fastened together.
- Expanded clay material is poured over expanded clay sand (mixture for dry floors) and the mixture is leveled.
- Using the level, lay the beacons on top of the backfill.
Important! Sometimes masters put guides directly on the subfloor. This is undesirable because noise bridges are created, which degrades the quality of the insulation.
- Moving along the guides with the help of a leveling rail, level the backfill.
- Gypsum sheets are laid on top of the aligned expanded clay layer. The laying direction is from the entrance. The edges of the sheets are fastened first with special mastic, and then with self-tapping screws along the gypsum fiber, flushing the heads of the screws in the sheet.
- Seams and holes above the screws are treated with putty.
All! Now you can start finishing finishing work.
to contents ↑Sound insulation of the floor under the screed - an overview of modern soundproof materials
Now we describe the most common materials for soundproofing a room.
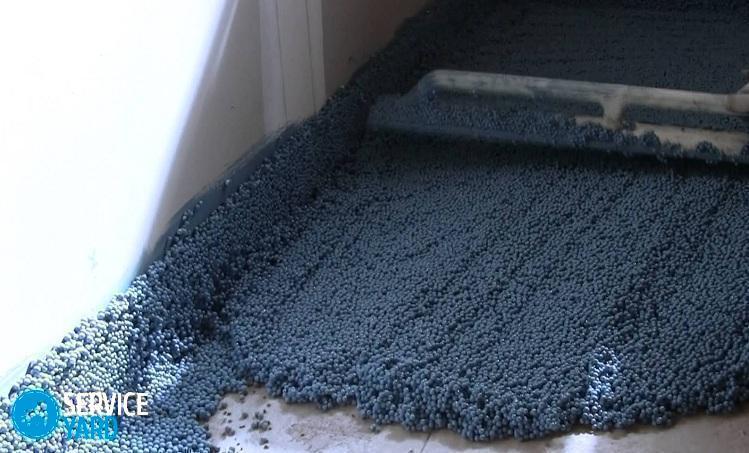
Shumoplast
Ready-to-use mixture formed by elastic granules, rubber additive and acrylic-based binder.
Important! Shumoplast is ideal for creating a soundproof layer in large rooms.
Benefits:
- No need for waterproofing.
- The amount of shrinkage does not exceed 5%.
- Laying is possible with small (no more than 1.5 cm) local surface irregularities.
- Long working resource.
- High application speed.
- Environmental Safety.
Important! Disadvantage: it does not dry out immediately. It will take about 24 hours to fully dry.
Texound
Roll noise insulation material with significant density. Its thickness is small (only 4 mm), so it can be used not only for floors, but also for noise insulation of the ceiling and walls.
Benefits:
- Resistance to decay and temperature changes.
- High elasticity.
- Almost unlimited work resource.
- Easy installation.
- Fire safety.
Important! Disadvantage: when laying on a concrete floor, a screed substrate is required.
Isoplaat
A soft sound absorber based on coniferous wood.
Benefits:
- Environmental Safety.
- Easy styling.
- Excellent noise and heat insulation characteristics.
Important! Minus: high price.
Stone wool
Dense material, according to the manufacturing technology resembling glass wool. Gabbro-basalt is used as a feedstock. Because of this, the material is known as basalt wool.
Benefits:
- Durability.
- Heat resistance.
- Easy installation.
- Environmental Safety.
- Resistant to shrinkage.
Important! There is a significant drawback: high hygroscopicity. Therefore, waterproofing is required during installation.
Soundproof
The components in the composition of this material are a bitumen-polymer layer and gas-foamed polyethylene foam.
Benefits:
- At the same time serves as a sound and hydroinsulator.
- Flexibility, elasticity.
- Ecological cleanliness.
- Significant variation in operating temperatures (from -25 to 85 degrees).
- Cheapness.
- Long service life.
Important! Disadvantages: they simply do not. Among the materials for soundproofing the floor under the screed, this is a kind of leader.
Shumoizol
Two-layer rolled material. The first layer is a nonwoven fabric base, the second is bitumen.
Benefits:
- Combination of sound and waterproofing effect.
- Environmental Safety.
- Durability.
- A wide range of operating temperatures (-25 - +85 degrees).
- Flexibility, elasticity.
to contents ↑Important! The downside is the high price.
Stock footage
Using a floor screed with sound insulation, you can improve the acoustics of the room and achieve silence in the apartment, which is important for the comfort and convenience of living.
- How to choose a vacuum cleaner taking into account the characteristics of the house and coatings?
- What to look for when choosing a water delivery
- How to quickly create comfort at home - tips for housewives
- How to choose the perfect TV - useful tips
- What to look for when choosing blinds
- What should be running shoes?
- What useful things can you buy in a hardware store
- Iphone 11 pro max review
- Than iPhone is better than Android smartphones
 (No ratings yet)