Concrete garage floor
Any car needs a comfortable garage, and this is not a luxury, but rather a necessity. When building a garage, special attention should be paid to the floor. Not only the convenience of your pastime in this room, but also the safety of the car depends on the material of its manufacture and the correct laying. We recommend that you consider the option of a concrete floor in the garage due to the fact that it meets many requirements - strong, reliable, moisture resistant. That's what we need! In order for the coating to fulfill its basic functions, the concrete floor in the garage needs to be done as correctly as possible. Today we will consider the advantages and disadvantages of such a flooring, provide you with instructions for its manufacture - from the construction of the foundation to pouring.
to contents ↑Advantages and disadvantages
Before you pour concrete in the garage floor, it will not hurt to familiarize yourself with the positive and negative sides of the coating, which will help you make the right choice.
Pros:
- Concrete flooring is considered the most popular flooring in garages.
- Such a floor is able to withstand strong and sometimes uneven loads.
- Concrete is resistant to temperature changes, oils, gasoline, solvents, is not afraid of fire.
- Quite resistant and durable coating.
Minuses:
- Abrasion of the upper concrete layer under the mechanical influence of the wheels of the machine or the feet of its owner. As a result of this, a large amount of dust is formed on the surface of the flooring, which falls on the surface of the body of your four-wheeled pet, tools and other items in the garage.
- Concrete is not considered moisture resistant material. It absorbs water and other liquids well with an unpleasant odor, which will then be felt in the air of your car shelter.
- Concrete floor can not be laid on all types of soil, but in all other cases, the floor is poured in the garage according to the standard scheme.
- The concreting process is a rather time-consuming process that requires a lot of free time, materials and tools, as well as great physical effort. However, the process itself has a simple technology that anyone who can perform all the step-by-step actions in strict sequence can cope with it.
to contents ↑Important! Depending on the purpose for which you equip the garage - whether your car will only stand in it or if it will be a full-fledged workshop, our tips will also come in handy to make a comfortable environment. Save yourself detailed step-by-step master classes:
Do-it-yourself floor screed in the garage. Construction stages
When pouring a concrete base, there are no problems with installing the floor - sand-cement or epoxy screed must be leveled over the finished slab, laid using special equipment or the top layer of an already frozen mortar.
Let's take a closer look at all the stages of manufacturing a concrete floor in a garage:
- Production of a viewing hole.
- Marking the level of the flooring on the walls, taking into account the necessary slope.
- Laying a waterproofing system. This step should only be carried out for a heated garage.
- Installation of reinforcing mesh.
- Preparation, pouring screed concrete base.This stage provides for laying compensation gaps and leveling the surface.
- Protection and increase the strength of the floor - ironing, applying an epoxy or polyurethane mixture, painting the coating in the garage with special protective compounds.
to contents ↑Important! All of the above steps should be carried out after the completion of the construction of the automobile box, but before the start of its interior decoration.
How to pour concrete in the garage floor with your own hands?
So, we came to consider the most important question: how and how to fill the floor in the garage? For the competent performance of work, stock up on basic information, everything you need and complete all the steps in the exact sequence.
Materials and tools:
- Fine-grained crushed stone (claydite pebbles should be taken for an insulated floor).
- Reinforcing mesh for fixing and strengthening the screed (you can take galvanized steel profiles).
- Waterproofing material (dense polyethylene, bulk waterproofing, ordinary roofing material).
- Cement, sand for reinforcement, gravel.
- Bulk floor, if planned.
- Brick for laying walls and pits.
- Concrete mixer.
- Level, rule.
- Putty knife.
- A metal corner for the edges of the viewing room, if you plan to install it.
We prepare the floor before pouring it according to the standard classical scheme:
- We remove the topsoil over the entire plane to the most dense layer.
- We remove up to about 1 meter of land.
- We compact the rather loose base with tamper, fill it with clay from above and form a smooth and even surface from it.
- Now we lay gravel or gravel, depending on the thickness and depth of the removed layer of the earth with a thickness of 40-80 cm.
- Everything is thoroughly rammed and level.
- Pour a sand cushion on top of the base with a height of 10 cm, and then compact the ground again.
- In order to control the thickness of the laid raw materials, we make marks after deepening on the walls to which sand is poured.
We lay a heater
This stage should be done to those drivers who work with the machine in the winter. To do this, you can take solid polystyrene, after which immediately we put a waterproofing layer and a reinforcing mesh under the screed.
Place insulation on top of the sand cushion
This is done so that dampness does not drag out the earth into the room. As a necessary material, you can use a dense polyethylene film, but roofing material, hydroglass glass and other materials that do not allow water to pass through are also suitable.
We make sure that we have small allowances on the walls, and the overlay of the paintings on each other is at least 10 cm. We fix the waterproofing with a construction stapler or nails. We got a semblance of a bath.
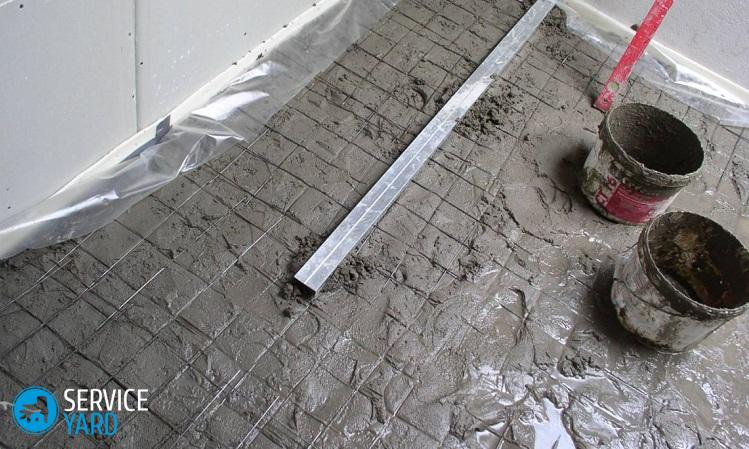
We lay the reinforcing mesh
It is from this step that the process of concreting the floor in the garage with your own hands begins. The reinforcing mesh is a wire base 0.7 cm thick and with 10x10 cm cells.
We strengthen the grid in a pre-installed formwork on small wooden substrates. This is necessary so that it does not lie too tightly to the film.
Important! For a small garage, formwork should be installed around the perimeter of the room. But for a large area, you should divide the internal partitions into sectors, which will be poured alternately with concrete mortar.
Preparing a solution
Concrete can be bought, but you can make it yourself with the following calculation: cement, gravel, sand - 1: 3: 3. All mix thoroughly and dilute with water to a thick sour cream. Knead concrete pouring in several containers for continuous application to the base.
Important! The layer thickness should be at least 40 cm. In the case of dividing the floor into sectors, pouring is done on them.
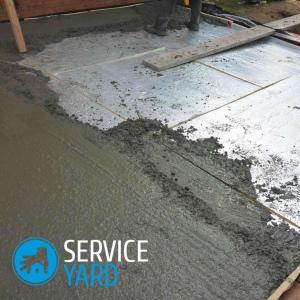
We fill the concrete screed on the base, taking into account the features of this type of room. So, for example, if you plan to wash the car in the garage, then you need to set a slight slope towards the drain.More often than not, drainage channels and a sewage system are not provided in the garage, therefore a bias is made towards the gate of the room.
Important! The best time to fill the concrete floor in winter is autumn or spring. Winter is the most unsuitable time for concreting due to the fact that the material does not harden, but simply freezes. But in the summer, the evaporation of moisture will be intense, so cracks may appear in the coating body.
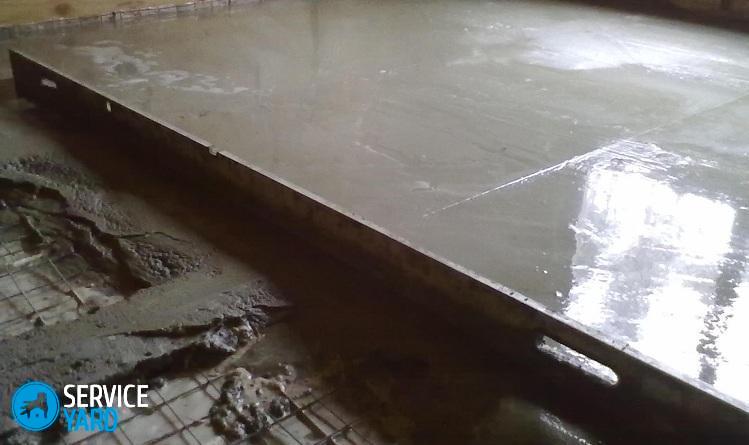
After setting the solution, remove the formwork boards and fill the cavity with the solution.
to contents ↑Important! Within a month after pouring, cover the concrete with a thick film and daily wet the base. This technology is necessary to prepare a flat surface of the base with no cracks in the room.
Stock footage
Now you won’t be bothered by the question of how to fill the concrete floor in the garage, because you already know the answer to it. If you approach the matter with special responsibility and compliance with all our recommendations, you can do the work yourself.
 (No ratings yet)