DIY kitchen sofa

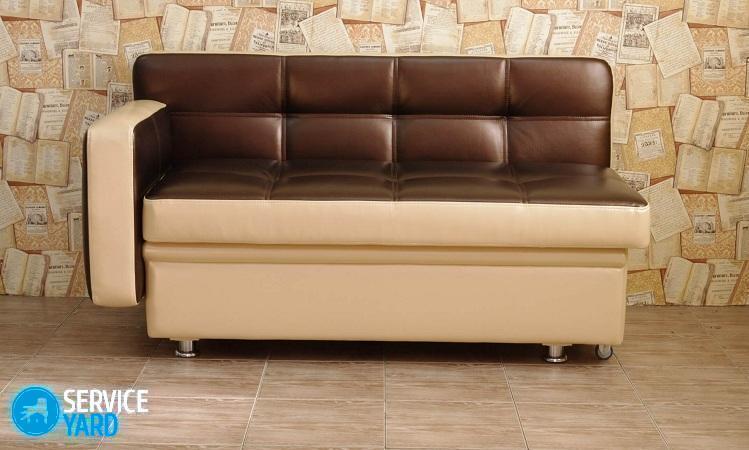
Soft kitchen corners are the most popular pieces of furniture used to equip a kitchen space or dining area. They are quite functional, while not taking up too much space, which is important for small rooms. In addition, the design of such a piece of furniture is quite simple, so anyone who can hold a hammer, a screwdriver and a drill can make a sofa into the kitchen with their own hands. And in order for you to have no difficulties during the manufacturing process, our specialists will in detail reveal to you all the subtleties and nuances of this process.
to contents ↑Features of kitchen corner sofas
A corner kitchen sofa is the best solution for arranging a kitchen with a small area. The main advantage of this design is that it is equipped with special places for storing various items that are located directly under the seat. In addition, if you approach the design of the kitchen space correctly, you can immediately get a working area and a dining room at the same time.
The manufacturing process of such a corner is quite simple. However, it consists of several stages. Next, we will talk in detail about each of them.
to contents ↑Stage 1. Preparatory work
The very first thing you need when planning and designing is to decide on the parameters of the future product.
Important! Experienced craftsmen recommend starting from standard sizes, since the slightest fluctuations can lead to the fact that the finished sofa will simply be uncomfortable.
Therefore, it is necessary to plan the quantity of materials and the assembly sequence taking into account the following parameters:
- Product height - 85 centimeters;
- Back height - 30 centimeters;
- The length of the large sofa is 120 centimeters;
- The length of the small sofa is 90 centimeters;
- The width of the sidewalls is 45 centimeters;
- The angular area of the seat is 45x45 centimeters;
- Seat height - 40 centimeters.
Important! Please note that these parameters are not final. When calculating, one should also focus on the number of family members. The most important thing is not to go beyond 120 centimeters for a small module and 150 centimeters for a large one.
Necessary tools and materials
You can make a kitchen corner sofa with your own hands from chipboard, but it is best to purchase a carpentry board made of pine, 2100x900x30 centimeters in size for these purposes.
In addition to this, you will also need:
- Bar 1.5x1.5 and 3x3 - 120 centimeters;
- Bar 2.5x2.5 - 360 centimeters;
- A bar with a section of 4x4 - 13.5 centimeters;
- Board with a section of 20x350 - 100 centimeters;
- Plywood sheet 1.2x45x255 centimeters;
- Rail 2x6 -210 centimeters;
- Foam rubber not less than 5 centimeters thick;
- Piano loops;
- Plugs for screws;
- Metal corners;
- Joiner's glue;
- Confirmates
- Drill;
- Screwdriver;
- Hacksaw;
- Jigsaw;
- Milling cutter;
- Roulette;
- Level;
- Stapler;
- Sandpaper;
- Scissors.
Stage 2. Installation of the main part
In order to install the main part of the kitchen sofa with your own hands, you need to follow the following algorithm of actions:
- Cut 2 sidewalls measuring 45x37 centimeters. The seat and back will be further mounted on them.
Important! The main load is bordered by the sides of the product, so it is best to make them from a joinery, the thickness of which should be at least 3 centimeters. Also, in the manufacture of sidewalls, you need to carefully approach the choice of their shape, since the future appearance of the finished product completely depends on this.
- Install the sidewalls of the sofa on a 4x4 block and 45 centimeters long.
- Fix one more block to the sidewall level.
- Make drawers under the seats.To do this, take 2 boards measuring 15x2.5x120 centimeters and 2 trim sizes 15x2.5x30 centimeters. They will act as side walls of the structure. Cover the bottom of the box with plywood, which must first be inserted into the grooves. Fasten the parts from the front side using self-tapping screws. Close openings with a profile level or caps.
Important! The length of the screws should be at least 6-7 centimeters.
- Connect the sidewalls using horizontal backrest bars for this purpose, and then fasten them to 4 upright posts. Screw a sheet of plywood to the racks. It will serve as the basis for foam rubber.
Important! Vertical racks are cut out from a bar measuring 2.5x7x26 centimeters.
- Assemble the seat frame from 2 longitudinal bars and 4 transverse ones. Insert the longitudinal bars into the ends through the sidewalls and fix them using self-tapping screws for this purpose. Cross strips need to be connected by a method of longitudinal thorns.
Important! Cross elements should be made in the sizes of 4х7х16 centimeters, and longitudinal - 4х7х120 centimeters.
- At the end of the assembly of the frame, screw the pre-cut sheet of plywood to the binding with screws.
- Using the piano loops, connect the seat cover to the rear longitudinal bar. Screw the backrest to the bar.
Stage 3. Fastening small modules and corner block
Make a small sofa on the same principle as you did a large one. The difference in this case is only in the longitudinal bars, the length of which should be about 90 centimeters. The assembly of the corner joint must begin with the manufacture of the seat itself, the dimensions of which should be 45x45 centimeters.
Important! The front and rear corner of the cover must be cut off.
Screw the finished seat to the sides of adjacent sofas using self-tapping screws for these purposes. The seat must be mounted on a beam, the cross section of which is at least 3x3 centimeters.
Next, the rear pillar of the corner connection is installed. To do this, use a trim board with dimensions of 3x35x100 centimeters:
- Saw the edge onto the cone, and then select the edges that are at an angle of 45 degrees.
- Secure them with the Euroscrews on the back to the end of the seat.
- Install additional backs made in the form of frames on both sides of the rack.
- Sew them with a sheet of plywood and screw them to the sidewalls with screws.
Stage 4. Upholstery of the kitchen sofa
The final step in the manufacture of a sofa for the kitchen with your own hands is fabric upholstery. For these purposes, it is best to choose synthetic and hypoallergenic fabrics that are easy to care for and clean. Most often, fabrics such as microfiber, velor, flock and jacquard are used for upholstery of kitchen sofas.
Important! To date, the most popular material for upholstery in a kitchen sofa is artificial or genuine leather. It is characterized by high reliability, environmental friendliness and ease of care.
As for the upholstery process itself, in order to carry it out, you must adhere to the following instructions:
- Check all elements of the finished structure for discrepancies.
- Disassemble the angular module into separate parts and cut them under a piece of foam rubber of the appropriate size. Cover the foam parts with a cloth.
- Reassemble the corner, focusing on the previously drilled holes.
- Paste foam on the seats and backs of sofas. Secure the upholstery with furniture staples.
to contents ↑Important! Be sure to leave allowances on the foam, which will close the ends. The allowances should be about 2 centimeters on each side. They should not be made too large, as problems may arise with the location of the cover.
Stock footage
Make yourself an angular sofa in the kitchen for everyone. The most important thing is to make all the calculations correctly and choose high-quality material. We hope that our advice will help you in this process, and you will eventually receive a piece of furniture that will become a bright accent of your kitchen interior.


